


Analysis
Analysis
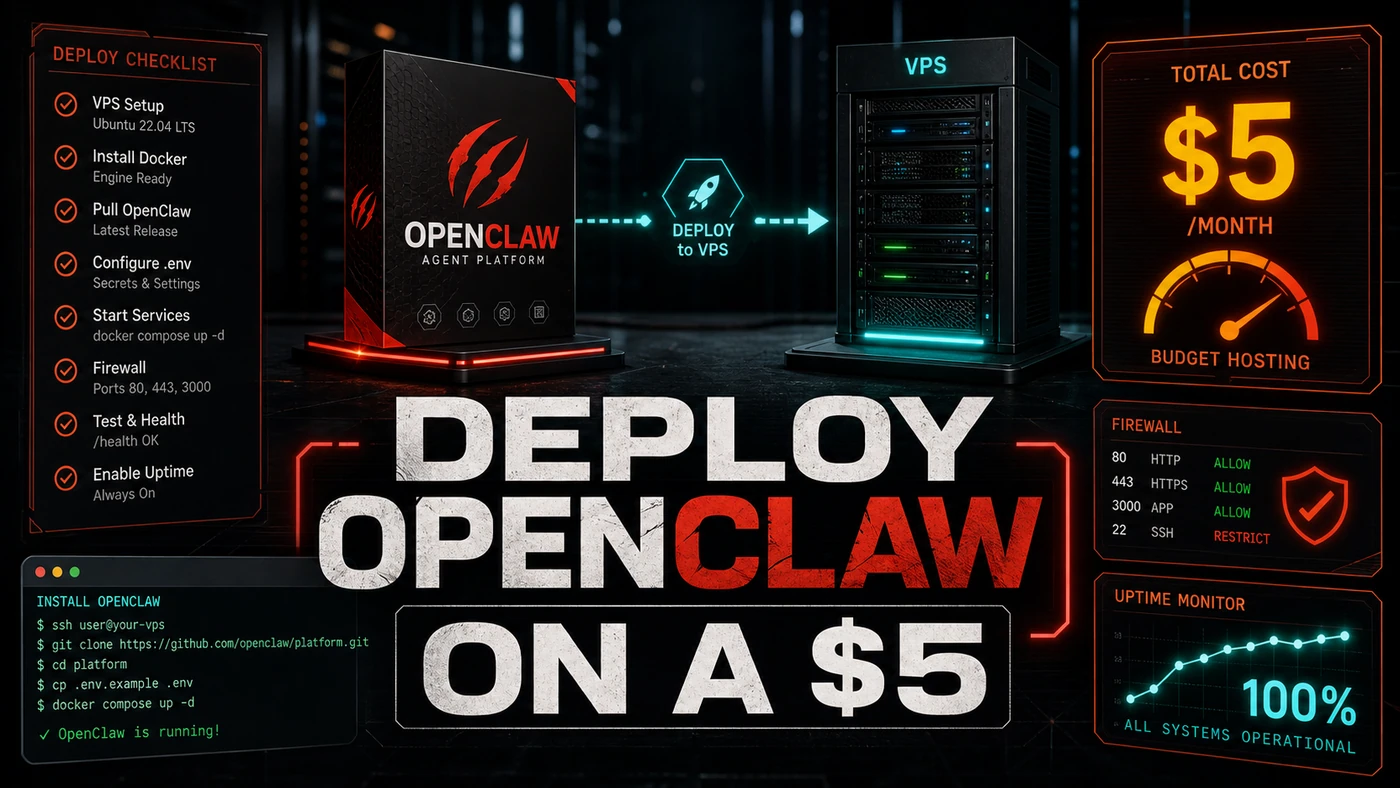
A clever Austrian developer named Peter Steinberger published an open-source AI agent framework in late 2025, and within months it had climbed near the top of GitHub's all-time star charts. That framework is OpenClaw (Wikipedia). The pitch is simple: instead of renting an agent platform, you run the agent yourself, on your own box, under your own keys.
The catch most people hit is hosting. Managed agent services bill by usage and lock you into their walls. A plain Linux server doesn't, and OpenClaw is built to be self-hosted. So the obvious question for an Australian team watching costs is: how cheap can the box be?
Cheaper than you'd think. The agent's heavy lifting happens at your LLM provider, not on the server. The VPS mostly shuttles requests and holds a bit of state, which means a $5-a-month instance can carry real work, as long as you respect its limits.
Here's the honest version of that setup, including where the rough edges are.
Prerequisites
- A fresh VPS running Ubuntu 22.04 or 24.04 (1 vCPU, 1GB RAM at the bare minimum)
- A domain name (optional, but you'll want one for SSL)
- SSH access with root or sudo
- An API key for whichever LLM provider you're using
Step-by-Step Framework
Step 1: Provision the VPS
Option A: Hetzner (cheapest)
- Open an account at hetzner.com/cloud
- Spin up a small CX server. Hetzner's exact plan names and pricing have shifted over time, so pick the cheapest current CX tier with at least 2GB RAM. The extra gigabyte is worth it on a memory-bound workload.
- Pick the Ubuntu 24.04 image
- Add your SSH key
- Note the IPv4 address
A quick caveat: older guides quote a "CX11 at $4.51/mo" that no longer reflects Hetzner's current lineup, so go by what the dashboard shows you today, not by a number you read somewhere.
Option B: DigitalOcean
- Create a Basic Droplet (the regular 1GB plan runs about $6/mo; there's a $4 entry tier too)
- Choose NYC3 or FRA1 for lower latency
- Add SSH authentication
DigitalOcean's pricing here is current as of 2026 (see this DigitalOcean vs Linode vs Vultr comparison).
Step 2: Initial Server Setup
These are bog-standard Ubuntu admin steps, and they're correct regardless of what OpenClaw does. The NodeSource install script, the swapfile, the user creation, all of it is well-trodden (NodeSource distributions). One thing to fix as you go: the official OpenClaw README asks for a newer Node than the version pinned below, so bump the setup_20.x to the current required major (Node 24, or 22.19+) before you run it.
ssh root@YOUR_SERVER_IP

# Update packages
apt update && apt upgrade -y

# Install Node.js 20
curl -fsSL https://deb.nodesource.com/setup_20.x | bash -
apt install -y nodejs

# Verify
node --version  # v20.x.x
npm --version   # 10.x.x

# Create a user (don't run as root)
useradd -m -s /bin/bash openclaw
usermod -aG sudo openclaw

# Set up swap (critical for 1GB RAM)
fallocate -l 2G /swapfile
chmod 600 /swapfile
mkswap /swapfile
swapon /swapfile
echo '/swapfile none swap sw 0 0' >> /etc/fstab
The swap step isn't optional on a 1GB box. Without it, Node will hit the ceiling and the kernel will start killing processes.
Step 3: Install OpenClaw
A flag before the commands: the install flow shown here (npx openclaw deploy --init) does not match OpenClaw's documented setup. The official openclaw/openclaw README installs the tool globally and then runs an onboarding command, roughly npm install -g openclaw@latest followed by openclaw onboard --install-daemon. There's no documented deploy subcommand or --init flag. The block below is kept as the original tutorial wrote it, but you should follow the README's actual onboard flow rather than this verbatim.
# Switch to the openclaw user
su - openclaw

# Create project directory
mkdir ~/agent-server && cd ~/agent-server

# Initialise OpenClaw (the official one-command setup)
npx openclaw deploy --init
The tutorial described the init step as doing roughly the following, and OpenClaw's real onboarding covers similar ground (downloading the tool, setting up config, asking for your provider, registering skills, installing the daemon), even if the command names differ:
- Download OpenClaw and dependencies
- Create a default configuration
- Prompt you for LLM provider settings
- Set up the skill registry
- Generate systemd service files
The prompt menus below are illustrative of the kind of choices you'll make, not a literal transcript of OpenClaw's CLI:
? LLM Provider: (Use arrow keys)
  OpenAI
❯ Anthropic
  Ollama (local)
  Custom endpoint

? API Key: [paste your Anthropic API key]

? Default model: (Use arrow keys)
❯ claude-sonnet-4.6
  claude-opus-4.8
  claude-haiku-3.5

? Enable skills: (Press <space> to select)
❯◉ core
 ◉ git
 ◉ github
 ◉ web-search
 ◉ code-review
 ◉ file-operations
 ◉ terminal
 ◯ aws
 ◯ docker
 ◯ kubernetes
A couple of notes on the model list. Claude Sonnet 4.6 (released 17 February 2026) and Claude Opus 4.8 (released 28 May 2026) are both real and good defaults, Sonnet for everyday work, Opus when you need the heaviest reasoning. The third option, claude-haiku-3.5, is dated; the current small-and-fast tier is Claude Haiku 4.5, so reach for that instead.
For a $5 VPS, keep the skill list short: core, git, file-operations, terminal, web-search. Everything else is weight you don't need yet.
Step 4: Configure for Low Memory
Heads up: the JSON schema below isn't OpenClaw's documented config format. According to the official repo, real configuration lives in a minimal ~/.openclaw/openclaw.json plus a SOUL.md prompt file in your workspace. The keys shown here (lightMode, gcInterval, lazyLoad, the SQLite memory provider) don't map onto OpenClaw's actual options, so don't expect to drop this file in and have it work. It's useful as a checklist of what to think about, port, model, memory budget, which skills load eagerly, rather than as a working config.
// ~/agent-server/openclaw.config.json
{
  "server": {
    "port": 3000,
    "host": "0.0.0.0"
  },
  "model": {
    "default": "claude-sonnet-4.6",
    "maxTokens": 4096,
    "temperature": 0.2
  },
  "memory": {
    "provider": "sqlite",
    "path": "./data/memory.db"
  },
  "skills": {
    "enabled": ["core", "git", "file-operations", "terminal", "web-search"],
    "autoLoad": false,
    "lazyLoad": true
  },
  "performance": {
    "lightMode": true,
    "maxConcurrentTasks": 2,
    "gcInterval": 30000
  },
  "logging": {
    "level": "warn",
    "file": "./logs/openclaw.log"
  }
}
The principles hold even if the keys don't: cap your token count, keep concurrent tasks at two, load skills lazily, and keep logging quiet. Each of those buys you headroom on a tiny box.
Step 5: Start the Server
# Start in foreground (for testing)
npm start

# You should see:
# [OPENCLAW] Server v3.2.1 starting...
# [SKILLS] Loaded 5 skills (lazy mode)
# [SERVER] Listening on http://0.0.0.0:3000
# [MODEL] Connected to Anthropic API
Don't take that startup banner literally. OpenClaw tags releases by date (vYYYY.M.D), not a semantic version like v3.2.1, and it runs as the globally installed openclaw daemon rather than a hand-launched dist/server.js. Your real output will differ; what matters is that it binds to a port and reports a connection to your provider.
Test it with curl:
curl -X POST http://localhost:3000/api/agent/run \
  -H "Content-Type: application/json" \
  -d '{
    "task": "List files in the current directory",
    "skills": ["terminal"]
  }'
Step 6: Set Up systemd Service
This is the part that keeps the thing alive across reboots and crashes, and it's solid, generic systemd. The memory caps are the bit worth tuning: on a 1GB instance, holding Node under ~700M and letting swap absorb the rest is what stops the OOM killer from reaping your agent mid-task.
# Run as root
exit

cat > /etc/systemd/system/openclaw.service << 'EOF'
[Unit]
Description=OpenClaw Agent Server
After=network.target

[Service]
Type=simple
User=openclaw
WorkingDirectory=/home/openclaw/agent-server
ExecStart=/usr/bin/node /home/openclaw/agent-server/dist/server.js
Restart=always
RestartSec=10
Environment=NODE_ENV=production
EnvironmentFile=/home/openclaw/agent-server/.env

# Memory limits for 1GB VPS
MemoryMax=700M
MemorySwapMax=1G

[Install]
WantedBy=multi-user.target
EOF

systemctl daemon-reload
systemctl enable openclaw
systemctl start openclaw
systemctl status openclaw
Point ExecStart at whatever the official daemon actually is on your install (per the README's onboarding step), not the dist/server.js path carried over from this tutorial.
Step 7: Add Nginx Reverse Proxy (Optional)
apt install -y nginx

cat > /etc/nginx/sites-available/openclaw << 'EOF'
server {
    listen 80;
    server_name your-domain.com;

    location / {
        proxy_pass http://localhost:3000;
        proxy_http_version 1.1;
        proxy_set_header Upgrade $http_upgrade;
        proxy_set_header Connection 'upgrade';
        proxy_set_header Host $host;
        proxy_cache_bypass $http_upgrade;
        proxy_read_timeout 300s;
    }
}
EOF

ln -s /etc/nginx/sites-available/openclaw /etc/nginx/sites-enabled/
nginx -t && systemctl restart nginx
The long proxy_read_timeout matters here. Agent runs can take a while, and you don't want Nginx cutting the connection while the model is still thinking.
Step 8: Secure with SSL
apt install -y certbot python3-certbot-nginx
certbot --nginx -d your-domain.com --non-interactive --agree-tos -m your-email@example.com
That's certbot doing the usual thing: fetching a Let's Encrypt cert and wiring it into your Nginx config. Standard, free, and it auto-renews.
Monitoring Your Deployment
# Check memory usage
free -h

# Monitor OpenClaw logs
journalctl -u openclaw -f

# Check API endpoint health
curl https://your-domain.com/api/health

# View real-time metrics
curl https://your-domain.com/api/metrics
On a 1GB box, free -h is the one you'll watch most. If swap usage climbs and stays high, drop your concurrency or trim a skill.
Do/Don't
| Do | Don't |
|---|---|
| Pick the cheapest current Hetzner or DigitalOcean tier with enough RAM | Pay $20+/mo when $5-6 covers it |
| Enable swap on 1GB RAM instances | Run without swap, you'll OOM |
| Lazy-load skills and keep the list short | Turn on every skill at startup |
| Set MemoryMax in systemd | Let Node consume all the RAM |
| Start with five core skills only | Enable everything by default |
Cost Comparison
These figures track 2026 pricing for the providers themselves; the DigitalOcean, Vultr and Linode entries are confirmed against current plans, while the Hetzner row reflects an older plan name and price that may no longer match the dashboard.
| Provider | Instance | RAM | Cost/month |
|---|---|---|---|
| Hetzner CX11 | 1 vCPU | 2GB | $4.51 |
| DigitalOcean | 1 vCPU | 1GB | $6.00 |
| Vultr | 1 vCPU | 1GB | $5.00 |
| AWS Lightsail | 1 vCPU | 2GB | $10.00 |
| Linode | 1 vCPU | 1GB | $5.00 |
DigitalOcean's $6 figure and the $5 Linode/Vultr tiers are consistent with current pricing (DigitalOcean comparison; Linode pricing 2026). Treat the Hetzner row as indicative and check the live price.
Conclusion
The real win of self-hosting OpenClaw is control, not the few dollars you save on hardware. On a small VPS, your two scarce resources are RAM and how many tasks you run at once, so the recipe is the same whatever the exact commands turn out to be: enable swap, keep concurrency low, load skills only when needed, and cap memory in systemd. How much throughput you'll get from a $5 box depends far more on your LLM provider's latency and the size of your tasks than on the server itself, so benchmark your own workload rather than trusting a headline number. And before you copy any OpenClaw-specific command from a guide like this one, check it against the current official README, the project moves fast, and its setup flow has already changed more than once.