
Lesson 34 of 38 · Guided walkthrough 2 - 12-18 min
Walkthrough: Codex CLI: end-to-end
Install the Codex CLI, sign in with your ChatGPT account, point it at a Git repo, ask read-only questions safely, then move up to workspace-write with on-request approvals, brief a small task, approve a command at the prompt, review the diff with /diff, verify with a test, and commit the result yourself.
Codex is OpenAI's agentic coding system, and the Codex CLI is the surface that brings it into your terminal where the prompt itself is the whole interface, no editor pane, no chat sidebar, just you, your repo, and an agent that reads, edits, runs commands, and checks its own work. Under the hood it runs the same GPT-5.5-class model and account context as the IDE extension, cloud delegation, and GitHub surfaces, so what you learn here transfers everywhere Codex lives. The thing that makes the CLI safe to actually use is its two-layer permission model: an OS-enforced sandbox (Seatbelt on macOS, namespace isolation on Linux and WSL2) that defines what the agent technically *can* touch, plus a separate approval policy that decides when it must stop and ask you. This walkthrough takes you from a clean machine to a reviewed, committed change the disciplined way, install and sign in, start read-only to get oriented, escalate to workspace-write with on-request approvals only when you're ready to edit, brief one small verifiable task, approve each command at its prompt, review the diff like a pull request, verify with a test, and commit the result yourself. Every step is a real terminal screen using the install commands, flags, sandbox modes, and approval policies the current OpenAI docs describe, so the muscle memory you build is the real workflow, not a toy.
What you'll learn
- How the Codex CLI turns your terminal into an agentic coding loop, the agent reads files, plans, edits, runs commands, and self-checks, while you stay the reviewer of every side effect
- The two install-and-auth fundamentals: getting the codex binary on your PATH (npm, Homebrew, install script, or PowerShell) and signing in with an included ChatGPT plan instead of managing an API key
- Codex's two-layer safety model, the OS-enforced sandbox (read-only, workspace-write, danger-full-access) and the separate approval policy (on-request and friends), and why they are deliberately independent controls
- The escalation discipline: start read-only to map an unfamiliar codebase, then move up to workspace-write with on-request approvals (the 'Auto' preset) only once you're ready to make edits
- How to scope a task so the agent can verify itself, a small, single-purpose brief plus a test and a lint run, which the prompting docs show produces higher-quality output
- Reading and approving command prompts deliberately, then reviewing the agent's work with /diff and /status as if it were a pull request before anything lands
- Closing the loop safely: verify with a passing test, then commit the change yourself so authorship, message, and the audit trail are clearly human
Why this matters
The sandbox and the approval policy are two different dials, learn to read both
The single most important mental model for the Codex CLI is that 'what the agent can do' is governed by two independent controls, not one. The sandbox is an OS-enforced boundary. Seatbelt on macOS, unprivileged namespace isolation (bubblewrap) on Linux and WSL2, and it has three settings: read-only (inspect files only), workspace-write (read, edit, and run routine commands inside the working directory, with network disabled by default), and danger-full-access (no boundaries at all, which you should almost never reach for). The approval policy is a separate dial that decides when Codex must pause and ask you before crossing the sandbox boundary; on-request means it works inside the sandbox automatically but stops to ask when it needs to write outside the workspace or reach the network. This separation is why the status line in every screen shows both 'sandbox' and 'approvals', and why the walkthrough has you glance at it before each task and confirm it with /status. The recommended local-development combination, workspace-write plus on-request, is what OpenAI calls the 'Auto' preset: low friction inside a version-controlled folder, but with a hard stop before anything genuinely risky. Internalizing these two dials means you can dial autonomy up for a trusted repo and down for an unfamiliar one without ever flying blind. You can even run your own commands under the same OS sandbox with codex sandbox, its help output, captured in the reference screens at the end of this lesson, names Seatbelt and bubblewrap explicitly.
Read-only first is a workflow, not a training-wheel, it changes the quality of the work
It's tempting to skip straight to workspace-write, but starting read-only is doing real work, not stalling. In an unfamiliar codebase the highest-leverage first move is to make the agent build an accurate map, 'explain how the transform module works and how other modules use it', before it's allowed to change a single line. Two things happen. First, you get safety for free: in read-only the sandbox physically blocks edits, command execution, and network access, so there is no way for a misunderstanding to mutate your tree. Second, and less obvious, you prime the agent's context with a correct model of the code, so when you do escalate and brief a task, its plan is grounded in what the project actually looks like rather than a guess. Only escalating once you understand the lay of the land, and only to workspace-write, not full access, is the same principle a careful engineer applies to a new repo: read, then change. The deliberate Ctrl+C-and-restart (or live /approvals switch) is the moment you consciously grant write access, and making that an explicit gesture keeps you from drifting into more autonomy than you intended.
You are the reviewer in the agentic loop, scope, verify, and commit are where humans add value
Codex can run hundreds of sequential tool calls and reason for a long time without intervention, which is exactly why your judgment has to live at the edges of the loop: how you scope the task going in, and how you verify and commit coming out. Going in, a small single-purpose brief that includes its own check, 'add a --json option, add a test for it, then run the linter', gives the agent a verifiable target and gives you a tractable diff to review; this is straight from the prompting guidance, and it beats a sprawling brief every time. Coming out, treat the agent's output exactly like a pull request from a fast but unsupervised colleague: read every line in /diff, optionally get a second pass with /review, and let a green test plus a reviewed diff, not the agent's confidence, be your signal to proceed. Finally, commit from your own shell rather than letting the agent do it. That keeps authorship and the commit message human, produces a clean checkpoint you can build on or roll back to, and leaves an honest audit trail of agent-assisted work, which matters more, not less, as the agent does more of the typing.
The disciplined Codex CLI loop
Clean machine to a reviewed, human-committed change, escalating autonomy one deliberate step at a time.
- Install + sign innpm install -g @openai/codex, then sign in with your ChatGPT plan instead of an API key
- Point at a clean repocd into a Git repo on a feature branch with a clean tree so changes are easy to see and revert
- Read-only to get orientedStart --sandbox read-only and ask plain questions to map the code, edits, commands, and network are blocked
- Escalate to workspace-write + on-requestRestart with the Auto preset so Codex edits in the workspace but still asks before risky actions
- Brief one small, verifiable taskAdd a --json flag, add a test, run the linter, a tight scope the agent can self-check
- Approve, then review with /diffRead each approval prompt before allowing it, then review every changed line like a pull request
- Verify with a test, commit yourselfConfirm a green test, then git commit from your own shell so authorship and the audit trail stay human
Before you start
- An active ChatGPT Plus, Pro, Business, Edu, or Enterprise plan (Codex is included), or an OpenAI API key as a fallback
- Node.js with npm installed for the npm path, or curl / Homebrew / PowerShell available for the other install paths
- A local Git repository you can experiment in, ideally on a clean feature branch
- A terminal you are comfortable in: macOS, Linux, or Windows PowerShell / WSL2 (Windows Subsystem for Linux)
Step by step
Install the Codex CLI
Type: npm install -g @openai/codex
# # Recommended if you already have Node: install globally via npm$ npm install -g @openai/codexadded 1 package in 4s# # Equivalent alternatives:# # brew install --cask codex# # curl -fsSL https://chatgpt.com/codex/install.sh | sh# # Windows: powershell -ExecutionPolicy ByPass -c "irm https://chatgpt.com/codex/install.ps1 | iex"✔ codex installed
Install the CLI globally so the codex command lands on your PATH. The npm package is @openai/codex; on macOS you can instead use the Homebrew cask or the standalone install script, and on Windows the PowerShell one-liner.
- 1Pick one install path. Use npm if Node is already set up. Homebrew, the curl script, and the PowerShell one-liner are equivalent ways to get the same binary.
- 2The -g flag matters. Installing globally puts codex on your PATH so you can run it from any directory, not just this folder.
Voiceover Start by installing the Codex CLI globally with npm, so the codex command is available from any terminal you open.
Confirm the install
Type: codex --version
$ codex --versioncodex-cli 0.x.x# # If you see 'command not found', open a new terminal tab and retry✔ codex resolves on PATH
Verify the binary resolves before going further. If the shell reports command not found, open a new terminal tab so the updated PATH is picked up, then retry. If you are curious what else the binary can do, run codex --help, the full command menu is captured in the reference screens at the end of this lesson.
- 1Command not found?. Close and reopen the terminal so the updated PATH loads, then run codex --version again.
Voiceover Once that finishes, run codex with the version flag to confirm it installed cleanly and see exactly which build you're on.
Launch Codex for the first time
Type: codex
$ codexWelcome to CodexSign in to continue> Sign in with ChatGPT Provide your own API key# # Use the arrow keys to move, Enter to select
Running codex with no arguments starts the interactive terminal UI. The first time you run it there are no stored credentials, so it goes straight to the sign-in screen.
- 1Prefer ChatGPT sign-in. Signing in with your included ChatGPT plan is the recommended path. The API key option is a fallback if you do not have a qualifying plan.
- 2Arrow keys select. Use the arrow keys to highlight an option and press Enter to confirm.
Voiceover Now launch Codex for the first time by simply typing codex, and give it a moment to set itself up.
Sign in with your ChatGPT account
Highlight "Sign in with ChatGPT" and press Enter
Starting local login server on http://localhost:1455Opening your browser to sign in...If it doesn't open, copy this URL into your browser: http://localhost:1455/auth/callback?...# # Approve the request in the browser, then come back here✔ Signed in. Press Enter to continue
Codex opens your browser to authenticate via ChatGPT and listens on a local callback URL. Approve the request in the browser, then return to the terminal where the session is now authenticated.
- 1Browser didn't open?. Copy the localhost URL printed in the terminal into any browser on the same machine to finish sign-in.
- 2Re-auth later. You can re-run authentication anytime by starting codex and choosing sign-in again; signing out clears stored credentials. codex login --help (see the reference screens below) lists the status subcommand and the API-key option.
Voiceover Choose Sign in with ChatGPT and press Enter, then complete the login in your browser to connect your account.
Move into your repository
Type: cd ~/code/your-repo then git status
$ cd ~/code/your-repo$ git statusOn branch feature/codex-trial✔ nothing to commit, working tree clean# # A clean tree on a feature branch makes Codex's changes easy to see and revert
Quit back to the shell with Ctrl+C (or open a new tab) and change into the Git repo you want to work in. Codex inspects the current directory to decide its default safety posture, so starting from a clean tree on a feature branch makes review and rollback easy.
- 1Start clean. A clean working tree on a feature branch makes it trivial to see and roll back exactly what Codex changes. A feature branch is a separate line of work you can merge or throw away without touching main.
- 2Tip: point Codex at a folder. You can also target a folder with codex --cd <path> (short form -C) without changing directories first.
Voiceover Change into the repository you want to work in, then run git status so you can see a clean starting point.
Start Codex read-only in the repo
Type: codex --sandbox read-only
$ codex --sandbox read-onlyCodex • sandbox: read-only • approvals: on-requestcwd: ~/code/your-repo (git: feature/codex-trial)Ask Codex anything about this project.✔ Read-only: Codex can read files and answer questions, but cannot edit or run commands without approval
Begin in the read-only sandbox so Codex can read files and answer questions but cannot edit anything, run commands, or touch the network without asking. This is the safe way to get oriented in an unfamiliar codebase.
- 1Read-only is safest. In read-only the sandbox blocks edits, command execution, and network access, which is ideal for an unfamiliar or untrusted project.
- 2Check the header. The status line shows the active sandbox and approval mode. Glance at it before every task so you know what Codex is allowed to do.
Voiceover Start Codex in read-only mode here, so it can look around and read your files but can't change anything yet.
Ask a read-only question to get oriented
Type: Explain how the transform module works and how other modules use it.
$ Explain how the transform module works and how other modules use it.Reading src/transform/index.ts, src/transform/pipeline.ts ...transform/ exposes applyTransform(input, opts). It's imported by ingest/loader.ts and api/handler.ts to normalize records before storage.✔ Answered from reads only, no files changed
Use a plain-English question to map the codebase. Codex reads the relevant files and explains them without changing anything, because the sandbox is read-only. This is a verbatim example prompt from the Codex prompting docs.
- 1Verbatim example. This exact phrasing comes from the official prompting guide. It's a great way to understand code before touching it.
- 2Nothing was written. In read-only mode the answer comes purely from reading files, so your working tree stays untouched.
Voiceover Ask it a plain question, like explaining what a particular module does, to get your bearings before making any edits.
Confirm your session settings
Type: /status
$ /statusModel: gpt-5.5Sandbox: read-onlyApprovals: on-requestWorkspace: ~/code/your-repo (version-controlled)Token usage: 4,210
Run the /status slash command to display the session configuration, including the active model, sandbox, approval mode, and which directory is the workspace. Confirm sandbox is read-only and approvals are on-request before you escalate.
- 1Slash commands. Type / to see available commands. /status, /diff, /approvals, and /review are the ones you'll use most in this flow.
- 2Know before you escalate. Confirm the current sandbox and approval mode here before you grant any write access.
Voiceover Type slash status to confirm your current settings, including the model, the sandbox mode, and which approval policy is active.
Escalate to workspace-write with on-request approvals
Press Ctrl+C, then type: codex --sandbox workspace-write --ask-for-approval on-request
$ codex --sandbox workspace-write --ask-for-approval on-requestCodex • sandbox: workspace-write • approvals: on-request✔ Codex can read files, make edits, and run commands in the working directoryNetwork access is disabled by default in workspace-write# # Git internals and agent config folders (.git.agents/.codex/) stay read-only and protected
Restart Codex in workspace-write so it can read, edit files, and run commands inside the working directory automatically, while on-request means it still pauses to ask before editing files outside the workspace, accessing the network, or running anything that escalates out of the sandbox.
- 1This is the 'Auto' preset. The docs describe workspace-write plus on-request as the Auto preset, the recommended default for version-controlled folders.
- 2Switch in-session too. Instead of restarting, you can change sandbox and approval mode live with the /approvals slash command.
Voiceover When you're ready to make changes, restart with workspace-write and on-request approvals, so Codex asks before running anything.
Give a small, focused task brief
Type: Add a new command-line option --json that outputs JSON. Add a test for it, then run the linter.
$ Add a new command-line option --json that outputs JSON. Add a test for it, then run the linter.Plan: 1. Add --json flag in src/cli/args.ts 2. Serialize output to JSON in src/cli/print.ts 3. Add test in test/cli.json.test.ts 4. Run the linter to validateEditing src/cli/args.ts ...
Keep the brief small and verifiable. The core instruction is a verbatim example from the prompting docs; adding a test and a lint run gives Codex a way to check its own work, which the docs say produces higher-quality output. A linter is a tool that automatically checks code for style problems and common errors, so it doubles as a self-check for the agent.
- 1Small and verifiable. Break work into focused steps with a way to verify each one. It's easier for Codex to test and for you to review.
- 2Ask it to plan first. If you're unsure how to scope a task, the docs suggest asking Codex to propose a plan before it starts editing.
Voiceover Give it a small, focused brief: add a json option, write a test for it, and run the linter once you're done.
Approve a command at the approval prompt
Select "Yes" and press Enter to run the linter once
Codex wants to run a command: $ npm run lintAllow this command?> Yes, run it Yes, and don't ask again this session No, don't run it✔ Approved. Running npm run lint ...✔ Lint passed: 0 problems
Because approvals are on-request, Codex pauses and asks before running the linter command. workspace-write lets routine in-workspace commands run automatically, but Codex still asks when it cannot be sure a command stays inside the sandbox, package scripts like npm run lint can spawn arbitrary processes, so it errs on the side of asking. Read exactly what it wants to run, then approve it once, approve and stop asking for the session, or deny it.
- 1Read before approving. Check the exact command before you allow it. Approve only what you understand and expect to run.
- 2Denying is always safe. Choosing "No" stops the command. Codex will adapt or propose a different approach instead of forcing the action.
Voiceover When the approval prompt appears, read what it wants to run, then select Yes and press Enter to run the linter once.
Review the diff
Type: /diff
$ /diffdiff --git a/src/cli/args.ts b/src/cli/args.ts+ .option('--json', 'output results as JSON')diff --git a/src/cli/print.ts b/src/cli/print.ts+ if (opts.json) return process.stdout.write(JSON.stringify(result))new file: test/cli.json.test.ts✔ 3 files changed, 1 new file
Run the /diff slash command to show the Git diff of everything Codex changed, including files that aren't tracked yet. Treat this exactly like a pull request you are reviewing line by line.
- 1Review like a PR. Read every changed line and run targeted checks before you trust the change, just as you would in code review.
- 2Want a second opinion?. Use the /review command to have Codex review its own working tree and flag issues before you commit.
Voiceover Type slash diff to review every change it made, line by line, before you decide whether to keep any of it.
Run the test to verify
Type: Run the new test and show me the result.
$ Run the new test and show me the result.Codex wants to run a command: $ npm test -- test/cli.json.test.ts> Yes, run it✔ PASS test/cli.json.test.ts (1 passed)# # Green test + reviewed diff = safe to commit
Ask Codex to run the test you requested. Because approvals are on-request, it pauses again, you approve the command, and you watch the test pass. Verification before committing.
- 1Verify before commit. A passing test plus a reviewed diff is your green light to commit the change.
- 2Approve each run. Every command Codex runs is its own approval, so you stay in control of all side effects.
Voiceover Ask it to run the new test and show you the result, so you can confirm the change actually behaves as intended.
Commit the reviewed change yourself
Type: git add -A then git commit -m "feat: add --json output flag"
$ git add -A$ git commit -m "feat: add --json output flag"[feature/codex-trial 9f2a1c4] feat: add --json output flag 3 files changed, 18 insertions(+)✔ Checkpoint saved, diff reviewed, test passing, change committed
Commit from your own shell so the message and authorship are yours, documenting the change for auditing. You now have a clean checkpoint to build on or roll back to.
- 1Document the decision. A clear commit message records what changed and why, which matters when auditing agent-assisted work.
- 2Full loop complete. Install, sign in, read-only, workspace-write, approve, review, verify, commit. That's the whole safe flow.
Voiceover Finally, commit the reviewed work yourself: stage everything with git add, then commit with a clear message describing the new flag.
Reference screens
Course screenshots and visual references for the lesson flow. Re-check the live product before paid delivery or public launch.
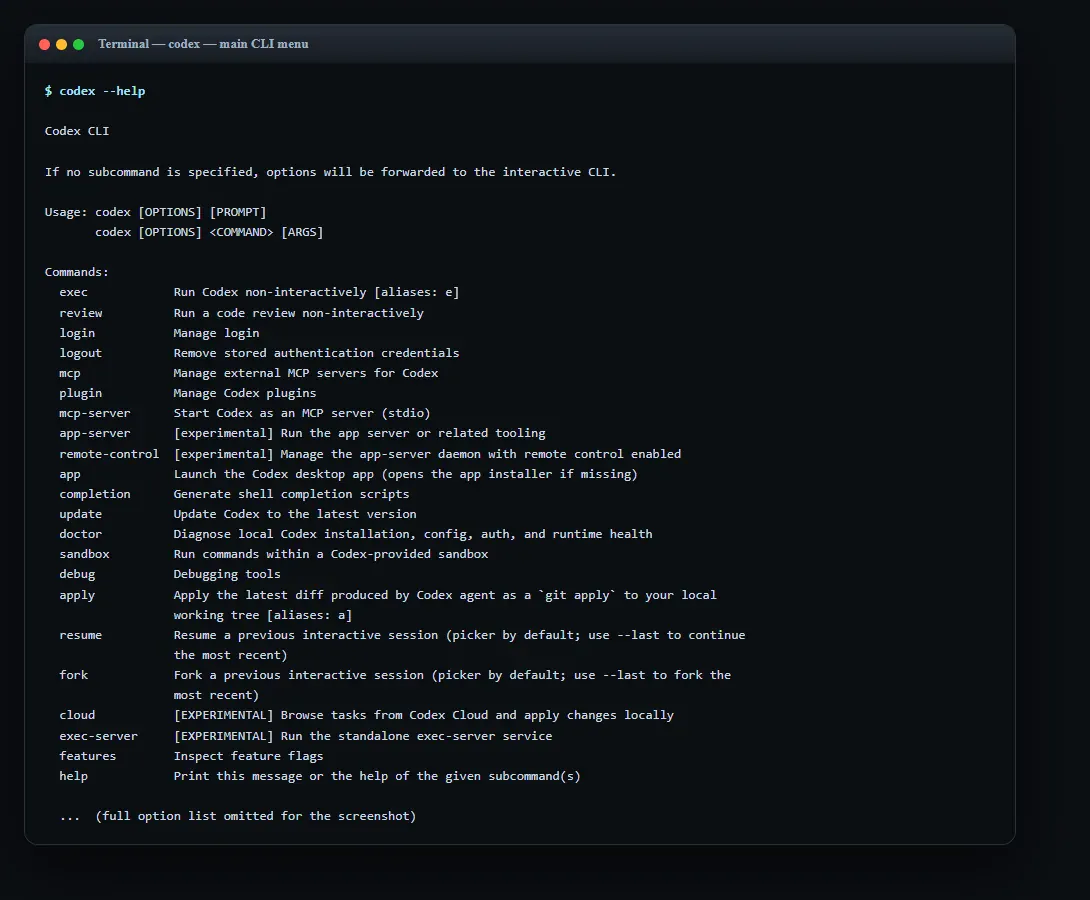
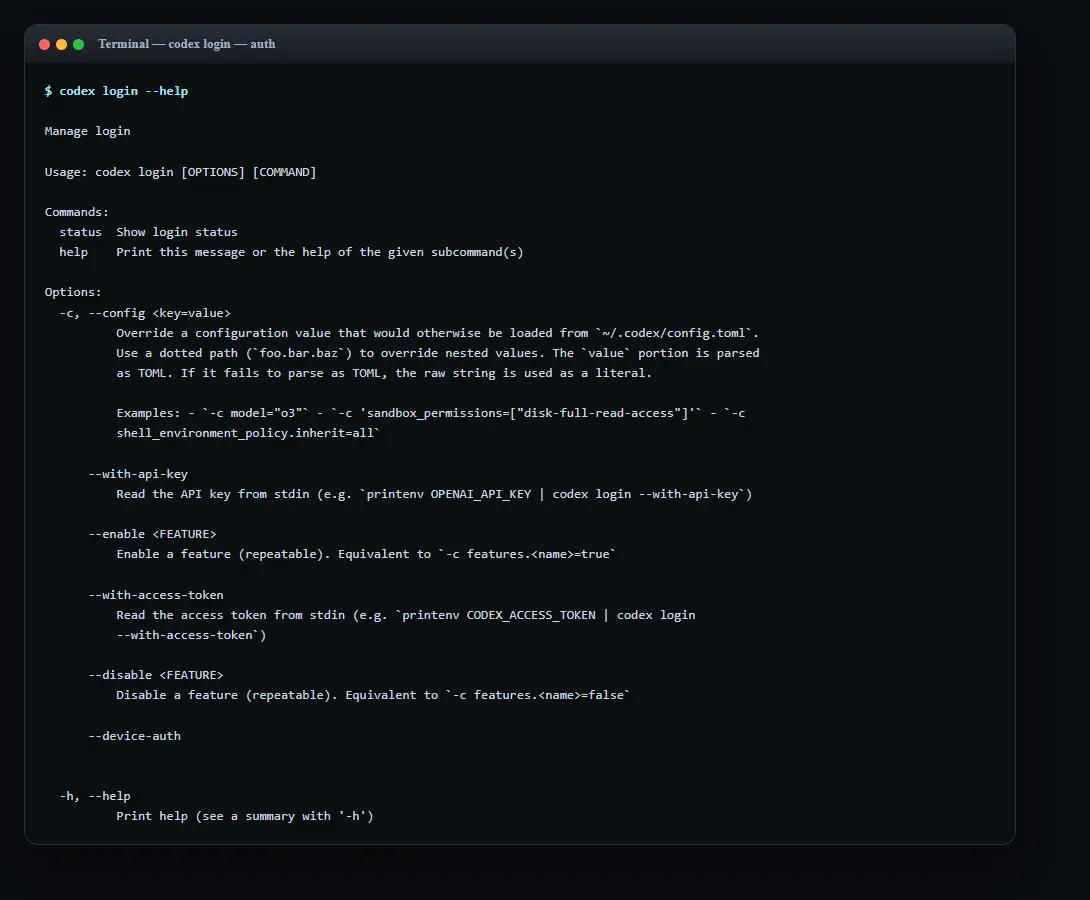
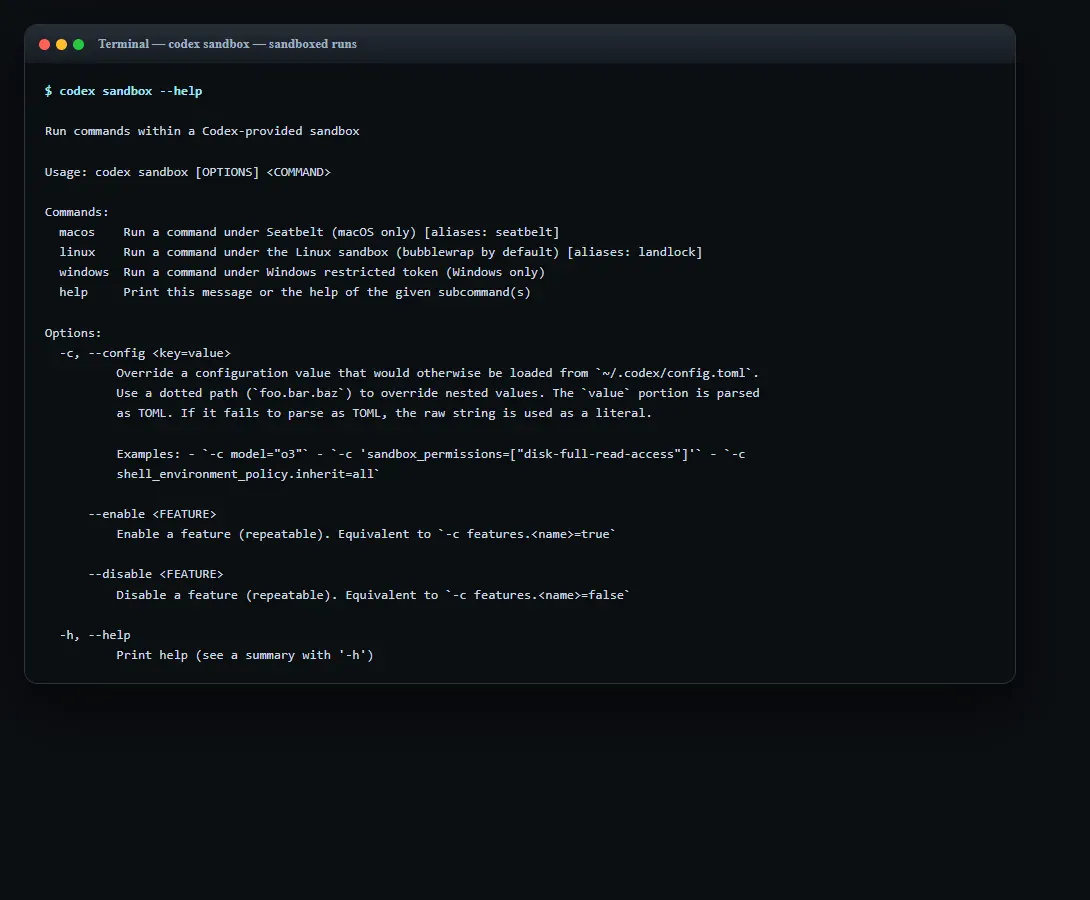
End-to-end recap
- Installed the Codex CLI with npm install -g @openai/codex (Homebrew, curl script, and the PowerShell one-liner are equivalent) and signed in with a ChatGPT account, with an API key as a fallback.
- Started in the read-only sandbox inside the repo to ask questions and map the code before granting any write access.
- Escalated to --sandbox workspace-write --ask-for-approval on-request (the Auto preset) only when ready to make edits, with network still disabled and .git.agents/, and .codex/ protected.
- Briefed a small, verifiable task, approved each command at its on-request prompt, and reviewed the full diff with /diff.
- Verified with a passing test, then committed the change yourself with a clear message as a clean checkpoint.
Voiceover script & storyboard
Read-aloud narration for recording the video, an intro line, one line per screen in order, then an outro. Pair each line with its matching step above.
- IntroThis is a quick, practical walkthrough of the Codex CLI, from installing it to making a small, reviewed change in your own repository.
- 1Start by installing the Codex CLI globally with npm, so the codex command is available from any terminal you open.
- 2Once that finishes, run codex with the version flag to confirm it installed cleanly and see exactly which build you're on.
- 3Now launch Codex for the first time by simply typing codex, and give it a moment to set itself up.
- 4Choose Sign in with ChatGPT and press Enter, then complete the login in your browser to connect your account.
- 5Change into the repository you want to work in, then run git status so you can see a clean starting point.
- 6Start Codex in read-only mode here, so it can look around and read your files but can't change anything yet.
- 7Ask it a plain question, like explaining what a particular module does, to get your bearings before making any edits.
- 8Type slash status to confirm your current settings, including the model, the sandbox mode, and which approval policy is active.
- 9When you're ready to make changes, restart with workspace-write and on-request approvals, so Codex asks before running anything.
- 10Give it a small, focused brief: add a json option, write a test for it, and run the linter once you're done.
- 11When the approval prompt appears, read what it wants to run, then select Yes and press Enter to run the linter once.
- 12Type slash diff to review every change it made, line by line, before you decide whether to keep any of it.
- 13Ask it to run the new test and show you the result, so you can confirm the change actually behaves as intended.
- 14Finally, commit the reviewed work yourself: stage everything with git add, then commit with a clear message describing the new flag.
- OutroThat's the core loop: read-only to get oriented, workspace-write for focused changes, review the diff, then commit it yourself when you're happy.
Resources
Checkpoint