
Lesson 38 of 38 · Guided walkthrough 6 - 18-26 min
Walkthrough: Claude Code CLI: full setup, auth, skills & plugins
Install Claude Code, log in safely, set permission modes and project memory, make a reviewed edit, build a skill, install a plugin from a marketplace, wire up an MCP server, and commit, all from the terminal.
Claude Code is Anthropic's agentic coding tool that lives in your terminal: it reads your codebase, plans a sequence of actions, runs real development tools to carry them out, and checks its own work, while you keep control of what actually lands. This walkthrough takes you from a bare terminal to a fully configured session in order, with no skipped steps. Every screen is the terminal itself, showing the exact command to type and the output you should see. The sequence is deliberate, install, authenticate, then configure permissions and memory before you touch a single line of code, because that order is what makes the agent both safe and genuinely useful. We bias toward caution throughout: explore read-only first, review every proposed diff, and only widen permissions when you have a concrete reason to.
What you'll learn
- How Claude Code's agentic loop works in practice, gather context, take action, verify, and why you stay in the driver's seat at the approval prompt.
- Authenticating safely: subscription vs. Console vs. provider, why /status is the source of truth, and how a stray ANTHROPIC_API_KEY silently overrides your plan.
- Permission modes as a safety dial: cycling default, acceptEdits, and plan with Shift+Tab, and choosing the least-privilege mode for each kind of task.
- Context engineering with CLAUDE.md, generating it via /init, refining it with /memory, and understanding project vs. user vs. local scope so the agent inherits the right knowledge.
- Building a Skill from a folder + SKILL.md: how the frontmatter description drives automatic invocation and how a dynamic command injects live context (your real git diff) before Claude reads it.
- Extending Claude Code with plugins from a marketplace, what a marketplace is, why namespacing matters, and the trust model behind code that runs with your privileges.
- Connecting external tools over MCP (Model Context Protocol) with an explicit scope (local / project / user), authenticating servers, and why team-shared servers wait for your approval.
- Driving Git conversationally, inspect, branch, and commit through natural language while the approval prompt keeps every command under your control.
Why this matters
Why the setup order is the lesson, not just plumbing
It's tempting to treat install-login-configure as boilerplate to rush through, but the order encodes how the agentic loop stays trustworthy. Claude Code works in three blended phases, it gathers context, takes action, and verifies results, using tools the whole way through. Everything you set up before your first edit shapes that loop: authentication decides which model and account run it, the permission mode decides whether 'take action' pauses for you or proceeds on its own, and CLAUDE.md decides what context the agent starts with on every run. Configure those first and the agent inherits your guardrails and your project knowledge by default. Skip them and you're either approving blind or handing autonomy to an agent that doesn't yet know your conventions. The cautious default, read-only exploration, then a reviewed diff at the approval prompt, is exactly the discipline that lets you scale up trust deliberately rather than all at once.
Memory, skills, and plugins are the same idea at three scopes
CLAUDE.md, Skills, and plugins all answer one question: what should be in context, and when? CLAUDE.md is always-on project memory, it's read at the start of every session and is where teams encode the institutional knowledge a senior dev would hand over in onboarding (conventions, test commands, files never to touch). A Skill is on-demand memory: its SKILL.md frontmatter description is how Claude decides to load it only when a request matches, which keeps the always-on context lean. A plugin is a distributable bundle of skills, hooks, subagents, and MCP servers, namespaced so multiple plugins coexist and shareable across repos via a marketplace. Understanding this hierarchy, always-on vs. on-demand vs. packaged-and-shared, is what lets you keep context tight (the lever that most affects whether Claude actually follows your instructions) instead of dumping everything into one bloated file.
Permissions and MCP scopes: least privilege as a habit
Two of this walkthrough's choices are really the same security instinct expressed twice. Permission modes are a dial on the 'take action' phase: default prompts before every edit and command, acceptEdits auto-applies file edits, plan stays strictly read-only, and a bypassPermissions mode exists but disables the prompts you rely on, reach for it only when you fully trust the task. In every mode except bypass, writes to protected paths like .git and .claude are never auto-approved, guarding repo state and Claude's own config. MCP scopes apply the same least-privilege logic to reach: local keeps a server private to one project, project shares it with the team via .mcp.json (and team-shared servers stay pending until you approve them), and user makes it available everywhere. Because plugins and MCP servers run with your privileges and can pull in external tools, the trust decision, what to install, which scope to grant, is yours to make deliberately, every time.
One-shot mode: claude -p
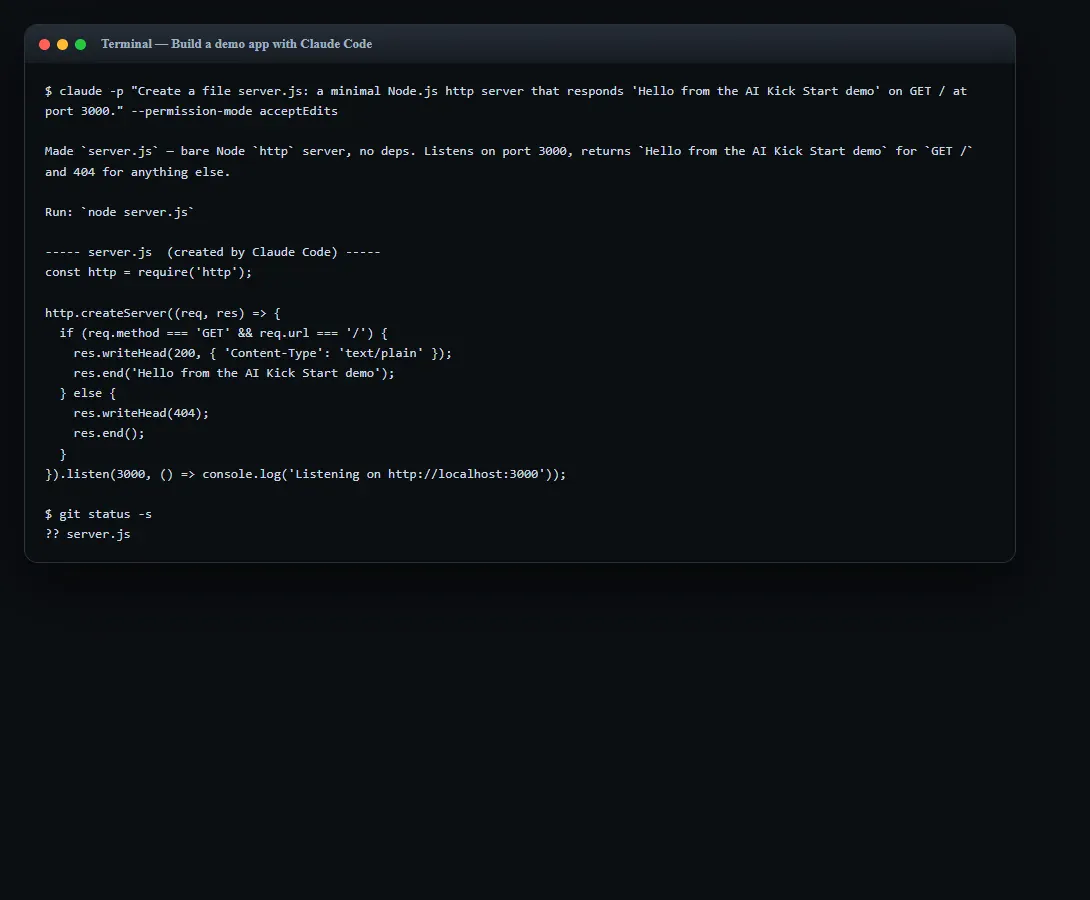
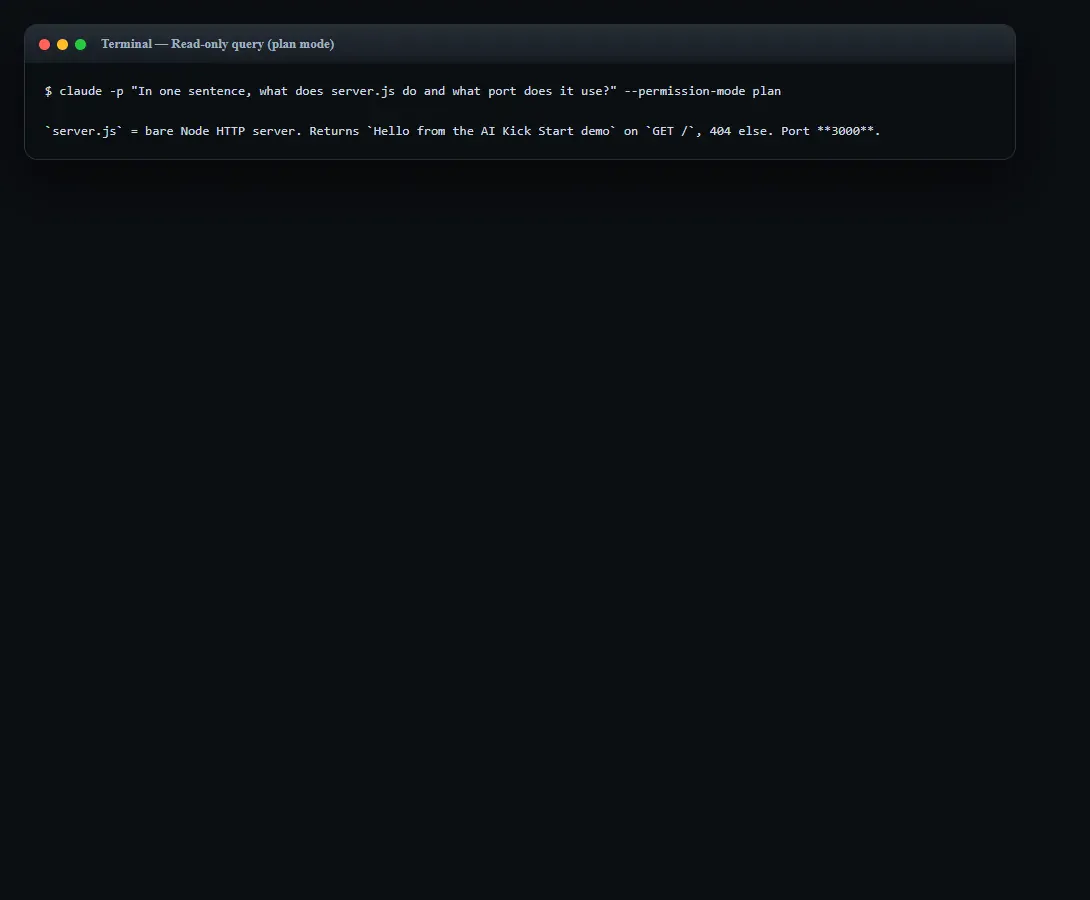
Everything in this walkthrough runs inside the interactive session, but the CLI also has a non-interactive print mode: claude -p "your prompt" runs one request, prints the answer to standard output, and exits, built for scripts, CI jobs, and quick one-off questions. Because there is no approval prompt to pause at, you pair it with an explicit permission mode: --permission-mode plan keeps the run strictly read-only, while --permission-mode acceptEdits lets it write files. The two captures in the gallery at the end of this lesson show both ends of that dial, one builds a small server.js with acceptEdits and reports what it created, the other answers a question about the same file in plan mode without touching anything. Same least-privilege habit, just scripted.
The Claude Code agentic loop
Every task runs this cycle, and the permission gate is where you stay in control.
- 1Gather context
Claude reads the files it needs on demand, package.json, source, README, plus your CLAUDE.md memory and any matching Skill, before deciding anything.
- 2Propose action
It plans a concrete next step and drafts the exact change or command: an edit diff, a shell command, or a git operation.
- 3Permission gate
In default mode it pauses at the approval prompt so you read the diff or command and choose Yes / don't-ask-again / No, protected paths like .git and .claude are never auto-approved.
- 4Act with tools
On approval it runs the real tool, applies the edit, executes the command, calls an MCP server, exactly as proposed.
- 5Verify results
It checks its own work (re-reads the file, runs git status or tests), reports what changed, and feeds the outcome back into the next pass of the loop.
Before you start
- A terminal open (PowerShell, CMD, Bash, or Zsh) and a code project to work in.
- A paid Claude plan (Pro, Max, Team, or Enterprise) or a Claude Console account, the free Claude.ai plan does not include Claude Code.
- An internet connection and a supported OS (macOS 13+, Windows 10 1809+, Ubuntu 20.04+, Debian 10+, or Alpine 3.19+).
- On native Windows, Git for Windows is recommended so Claude Code can use the Bash tool (optional, it falls back to PowerShell).
- Git installed and a repository initialised if you want to try the commit and branch steps.
Step by step
Install Claude Code (native installer)
curl -fsSL https://claude.ai/install.sh | bash (Windows PowerShell: irm https://claude.ai/install.ps1 | iex)
# # macOS / Linux / WSL$ curl -fsSL https://claude.ai/install.sh | bashDownloading Claude Code...✔ Claude Code installed to ~/.local/bin/claude# # Windows PowerShell (prompt shows PS C:\)$ irm https://claude.ai/install.ps1 | iexInstalled claude.exe to %USERPROFILE%\.local\bin
Run the one-line native installer for your OS. On macOS, Linux, and WSL use the curl script; on Windows PowerShell use the irm pipe. Native installs auto-update in the background. You'll know it worked when you see the 'installed to ~/.local/bin' confirmation line, that's the binary landing on disk.
- 1PowerShell vs CMD. If you see "The token '&&' is not a valid statement separator" you're in PowerShell; if 'irm' is not recognised you're in CMD, pick the matching command.
- 2Git for Windows. Installing Git for Windows is optional but lets Claude Code use the Bash tool instead of PowerShell.
Voiceover Start by running the native installer for your platform. On Mac or Linux use the curl line; on Windows PowerShell use the irm pipe, and it'll drop the binary into your local bin.
Verify the install
claude --version
$ claude --version✔ 2.1.161 (Claude Code)# # Optional deeper diagnostic$ claude doctor✔ Installation: healthy Auto-update: up to date
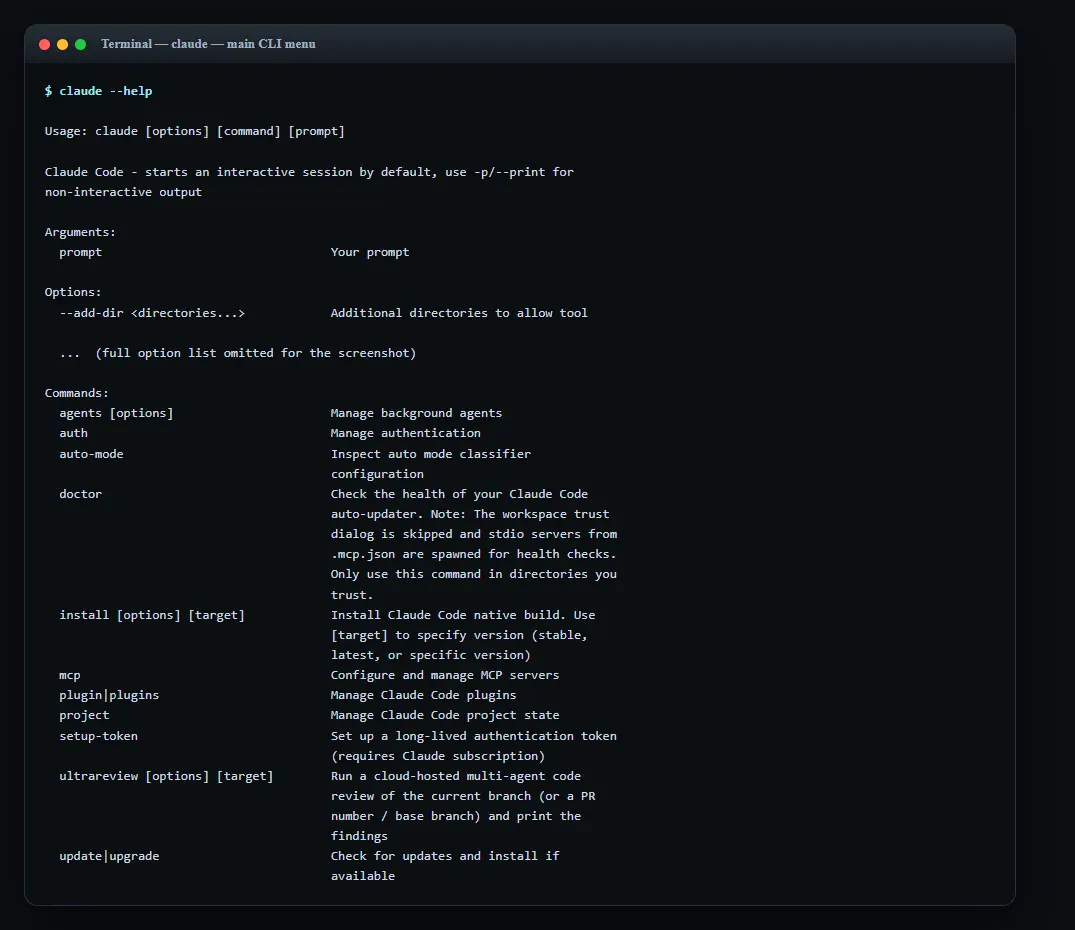
Confirm the binary is on your PATH. If you want a deeper health check of your install and config, run claude doctor. To see every subcommand the CLI offers, run claude --help, there's a real capture of that menu in the gallery at the end of this lesson.
- 1command not found?. Open a new terminal so PATH refreshes, or see the install troubleshooting guide.
Voiceover Confirm it worked by checking the version. If the command isn't found, open a fresh terminal so your PATH picks up the new binary, then run claude doctor for a full health check.
First run and browser login
cd /path/to/your/project then claude
$ cd ~/projects/my-app$ claudeWelcome to Claude CodeOpening browser to log in...If the browser didn't open, press 'c' to copy the login URL.✔ Logged in. Credentials stored, you won't need to log in again.
Open Claude Code inside your project directory. On first launch it opens a browser to log in. If the browser doesn't open, press c to copy the URL.
- 1Paste-code fallback. In WSL2, SSH, or containers the browser may show a code, paste it at the 'Paste code here if prompted' prompt.
Voiceover Change into your project folder and run claude. The first launch pops a browser to sign in; if it doesn't open, press c to copy the URL and paste it into your browser yourself.
Choose your account / auth method
/login (and check with /status)
$ /loginSelect account type: > Claude Pro / Max / Team / Enterprise (recommended) Claude Console (API access, pre-paid credits)✔ Authenticated via Claude subscription (OAuth)$ /statusVersion 2.1.161 Model: default Account: you@company.comIf an ANTHROPIC_API_KEY is set in env it will take precedence once approved.
Use /login to pick or switch accounts: a Claude subscription, a Console account, or a cloud provider. /status shows which auth method is actually active.
- 1API key vs subscription. If an ANTHROPIC_API_KEY is set it overrides your subscription once approved; run unset ANTHROPIC_API_KEY to fall back, then check /status.
- 2Console first login. A 'Claude Code' workspace is auto-created in the Console for centralised cost tracking.
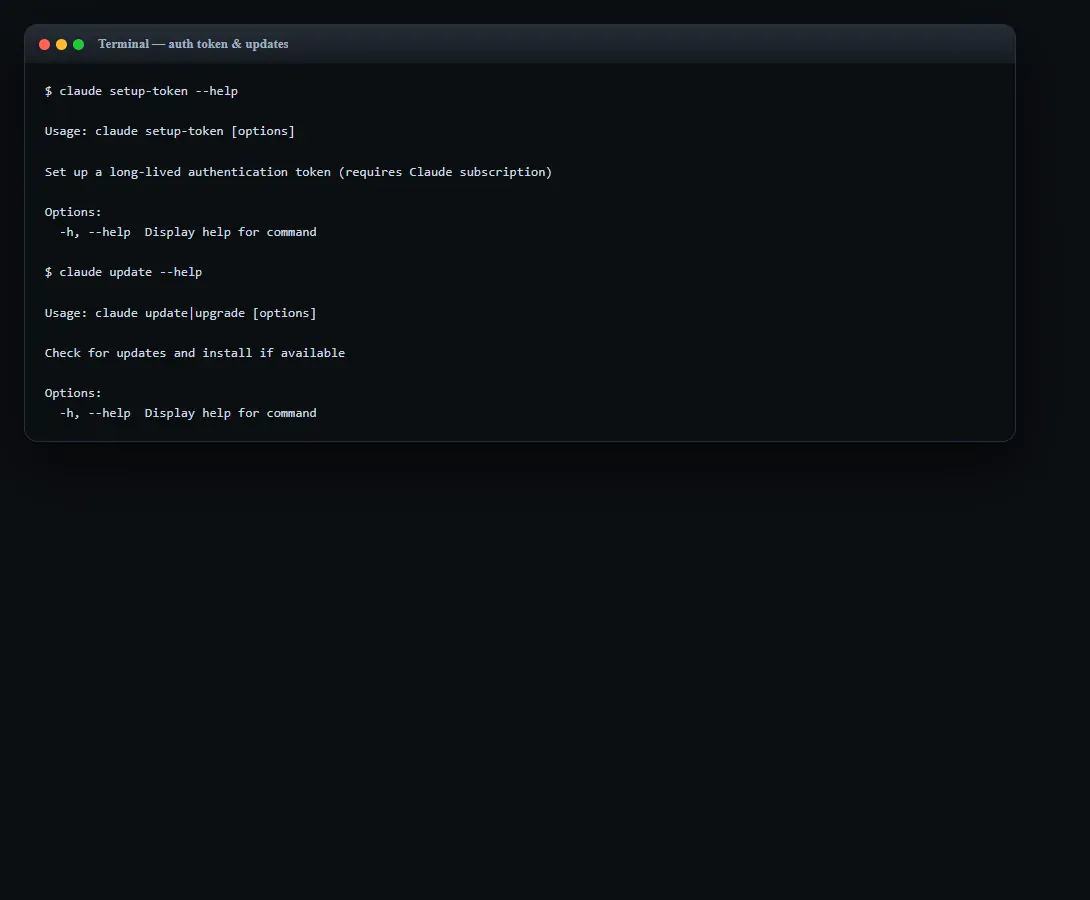
- 3Long-lived tokens. For CI or headless machines, claude setup-token mints a durable auth token tied to your subscription, see the setup-token and update capture in the gallery at the end of this lesson.
Voiceover Use slash-login any time to switch accounts, and slash-status to confirm which credential is actually in use. Watch out for a stray API key in your environment, it quietly takes precedence over your subscription.
Set a cautious permission mode
Press Shift+Tab to cycle modes
# # Press Shift+Tab to cycle; the footer shows the active mode[ mode: default ], asks before edits and commands[ mode: acceptEdits ], auto-accepts file edits this session[ mode: plan ], read-only planning, no changes✔ Staying on 'default' for a safety-first first session.
Shift+Tab cycles through default, acceptEdits, plan, and any modes you've enabled. Leave it on the cautious default so every edit and command asks first. You'll know it's working when the mode name in the footer changes each time you press Shift+Tab.
- 1Plan mode. Plan mode lets Claude research and propose without touching files, ideal before a large change.
- 2bypassPermissions. A bypassPermissions mode exists but skips all prompts; avoid it unless you fully trust the task.
Voiceover Shift+Tab cycles the permission mode shown in the footer: default asks before everything, acceptEdits auto-applies edits, and plan stays read-only. For a first session, stay on the cautious default.
Explore the codebase read-only
Type a question: what does this project do?
$ what does this project do?Reading package.json, src/index.ts, README.md...This is an Express API that serves user profiles backed by PostgreSQL.$ where is the main entry point?✔ src/index.ts, it boots the server and mounts /api routes.
Start by letting Claude read and summarise. It pulls files into context as needed, you don't add them manually, and makes no changes while you ask questions.
- 1No manual context. Claude reads project files on demand; you don't have to attach them.
Voiceover Before changing anything, let Claude explore. Ask what the project does or where the entry point lives, it reads the files it needs on its own and answers without making edits.
Generate project memory with /init
/init
$ /initAnalysing codebase: build tooling, tests, conventions...Proposed ./CLAUDE.md: ## Commands, build: npm run build test: npm test ## Conventions, 2-space indent, API handlers in src/api/handlers/✔ Wrote ./CLAUDE.md (commit it so your team shares it).
Run /init so Claude analyses the repo and writes a starting CLAUDE.md with build commands, test instructions, and conventions. If one exists, it suggests improvements instead of overwriting.
- 1Project vs user scope. ./CLAUDE.md is team-shared via git; ~/.claude/CLAUDE.md applies to all your projects; CLAUDE.local.md is personal and should be gitignored.
- 2Interactive init. Set CLAUDE_CODE_NEW_INIT=1 for a multi-phase flow that also sets up skills and hooks.
Voiceover Run slash-init and Claude scans the repo, then proposes a CLAUDE.md with your build and test commands and conventions. This is project-scoped memory, commit it so the whole team gets the same context.
Review and refine memory with /memory
/memory
$ /memoryLoaded memory files: ./CLAUDE.md (project) ~/.claude/CLAUDE.md (user) Auto memory: ON [open auto-memory folder]✔ Select a file to open it in your editor.
Open /memory to see every CLAUDE.md, CLAUDE.local.md, and rules file loaded this session, toggle auto-memory, and open any file in your editor to refine it.
- 1Keep it tight. Target under 200 lines per CLAUDE.md, longer files cost context and reduce adherence.
- 2Imports. Pull in other files with @path syntax, e.g. @README or @docs/git-instructions.md.
Voiceover Slash-memory lists every instruction file currently loaded and lets you open one to edit. Keep each CLAUDE.md concise and specific, that's what makes Claude actually follow it.
Make your first edit and review the diff
Type: add a hello world function to the main file
$ add a hello world function to the main fileEdit src/index.ts + export function helloWorld() { + return 'Hello, world!'; + }Do you want to make this edit to src/index.ts? > Yes Yes, and don't ask again this session No✔ Applied edit to src/index.ts
Ask for a small change. In default mode Claude proposes a diff and waits at the approval prompt, read it, then accept or reject.
- 1Read before you accept. Inspect the diff at the prompt; choose 'Yes' for one edit or 'don't ask again' to accept edits for the rest of the session.
Voiceover Ask for a simple change and Claude shows the exact diff, then pauses for approval. Read it line by line, then choose Yes for this one edit, or accept-all if you trust the run.
Learn the everyday slash commands
/help (then /clear and /compact as needed)
$ /help/clear Start a new conversation with empty context/compact Free up context by summarising the conversation/status Version, model, account, connectivity/config Open settings (theme, model, output style)$ /compact✔ Conversation summarised; project CLAUDE.md re-injected.
Type /help to list everything, or / to filter. /clear starts a fresh conversation keeping project memory; /compact summarises a long conversation to free context.
- 1/clear vs /compact. /clear wipes the conversation (memory survives); /compact keeps the same thread but shrinks it. Both keep your CLAUDE.md.
Voiceover Type slash-help to see every command, or just slash to filter. The two you'll reach for most are slash-clear to start fresh and slash-compact to shrink a long conversation without losing your project memory.
Create a skill, the directory
mkdir -p ~/.claude/skills/summarize-changes
# # Run this in a normal shell (or via ! shell mode)$ mkdir -p ~/.claude/skills/summarize-changes✔ Created ~/.claude/skills/summarize-changes/# # Project-scoped alternative: .claude/skills/<name>/
Personal skills live under ~/.claude/skills/ and work across all your projects; project skills go in .claude/skills/. The directory name becomes the command you type. Success is the folder existing: ls ~/.claude/skills should now list summarize-changes.
- 1Where skills live. Personal: ~/.claude/skills/<name>/SKILL.md. Project: .claude/skills/<name>/SKILL.md. The folder name is the command.
Voiceover A skill is just a folder with a SKILL.md inside. Make a directory under your personal skills folder, the folder name, summarize-changes, becomes the slash command you'll type.
Create a skill, write SKILL.md
Save SKILL.md with frontmatter + body
# # ~/.claude/skills/summarize-changes/SKILL.md---description: Summarizes uncommitted changes and flags anything risky. Use when the user asks what changed or wants a commit message.---## Current changes(dynamic) run: git diff HEAD## InstructionsSummarize the changes above in two or three bullets, then list risks like missing error handling or hardcoded values.
Every SKILL.md has YAML frontmatter, the block between the --- markers at the top, holding a description that tells Claude when to use the skill, and a markdown body of instructions. A dynamic git-diff line injects live shell output before Claude reads it.
- 1Description matters. The description is how Claude decides to auto-load the skill, put the key use case first and use natural keywords.
- 2Dynamic context. A dynamic git-diff line runs first and its output replaces the line, so Claude sees your real diff inlined.
Voiceover Inside, write a SKILL.md: frontmatter with a clear description so Claude knows when to use it, then your instructions. The dynamic git-diff line pre-runs and inlines your real diff before Claude ever reads the skill.
Invoke the skill, implicit and explicit
Ask "what did I change?" or type /summarize-changes
# # Implicit, matches the description$ what did I change?Using skill: summarize-changes✔ - Added helloWorld() to src/index.ts. Risk: no test coverage yet.# # Explicit, call it by name$ /summarize-changes✔ - Same summary, invoked directly.
Claude can load the skill automatically when your request matches the description, or you can invoke it directly with its slash name. Edits to the file are picked up live.
- 1Live reload. Editing a SKILL.md under a watched skills dir takes effect in-session; a brand-new top-level skills dir needs a restart, or run /reload-skills.
Voiceover Now use it two ways: ask a question that matches the description and Claude loads the skill on its own, or type slash-summarize-changes to run it explicitly. Edits to the file are picked up without restarting.
Add a plugin marketplace
/plugin marketplace add anthropics/claude-code
$ /plugin marketplace add anthropics/claude-codeFetching marketplace catalog from anthropics/claude-code...✔ Added marketplace 'claude-code-plugins'. Browse with /plugin.# # Official marketplace 'claude-plugins-official' is already available
A marketplace is a catalog of plugins. Adding one registers it so you can browse, nothing is installed yet. The official marketplace is already available. Note the name in the confirmation: a marketplace registers under the name declared in its marketplace.json, here claude-code-plugins, not the repo name, and that 'Added marketplace' line is your success signal.
- 1Trust first. Plugins run with your privileges, only add marketplaces and install plugins from sources you trust.
- 2Sources. Accepts owner/repo, full git URLs, local paths, or a remote marketplace.json URL.
Voiceover Plugins come from marketplaces. Add one with slash-plugin marketplace add and an owner-slash-repo, that just registers the catalog. Only ever add sources you trust, because plugins run with your privileges.
Install and activate a plugin
/plugin install commit-commands@claude-code-plugins then /reload-plugins
$ /plugin install commit-commands@claude-code-plugins✔ Installed commit-commands (user scope).$ /reload-plugins✔ Reloaded: 1 plugin, 3 skills, 0 agents, 0 hooks.$ /commit-commands:commitPlugin skills are namespaced as /<plugin>:<skill>.
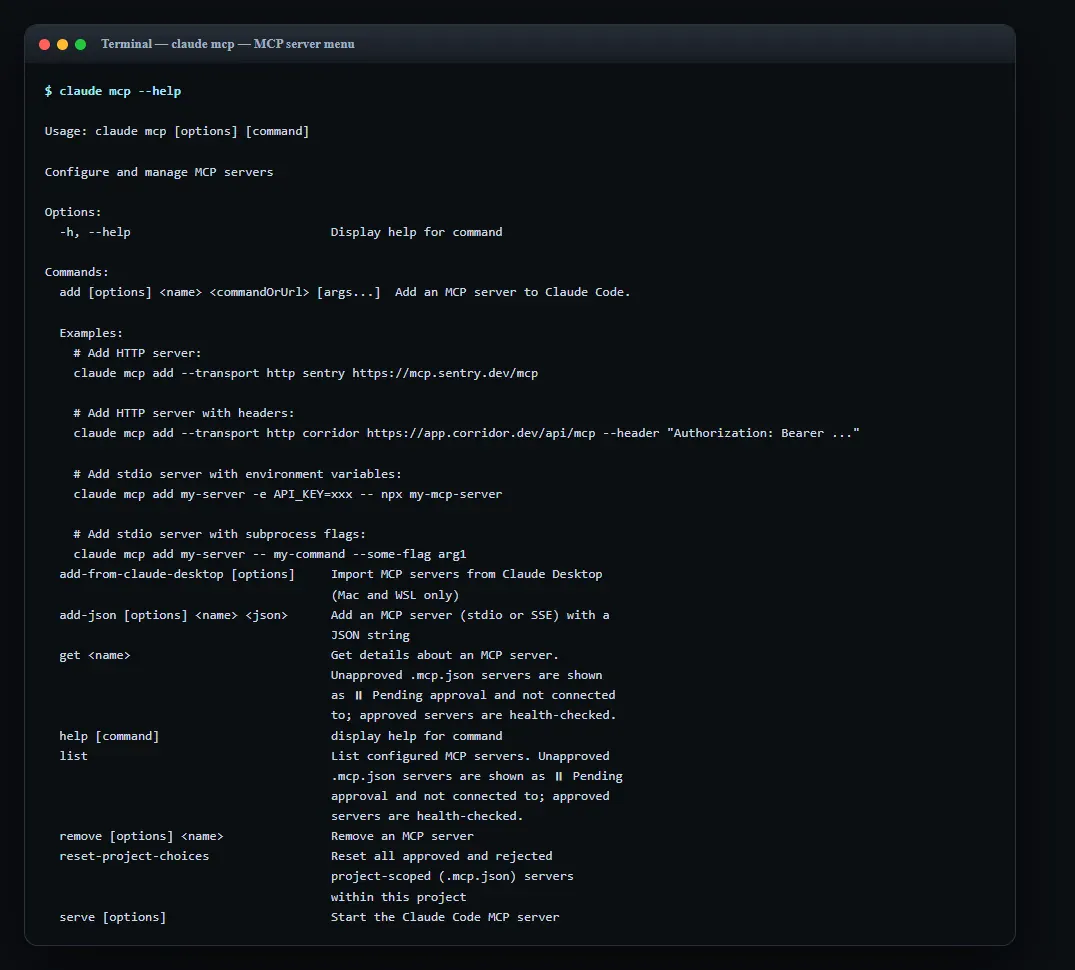
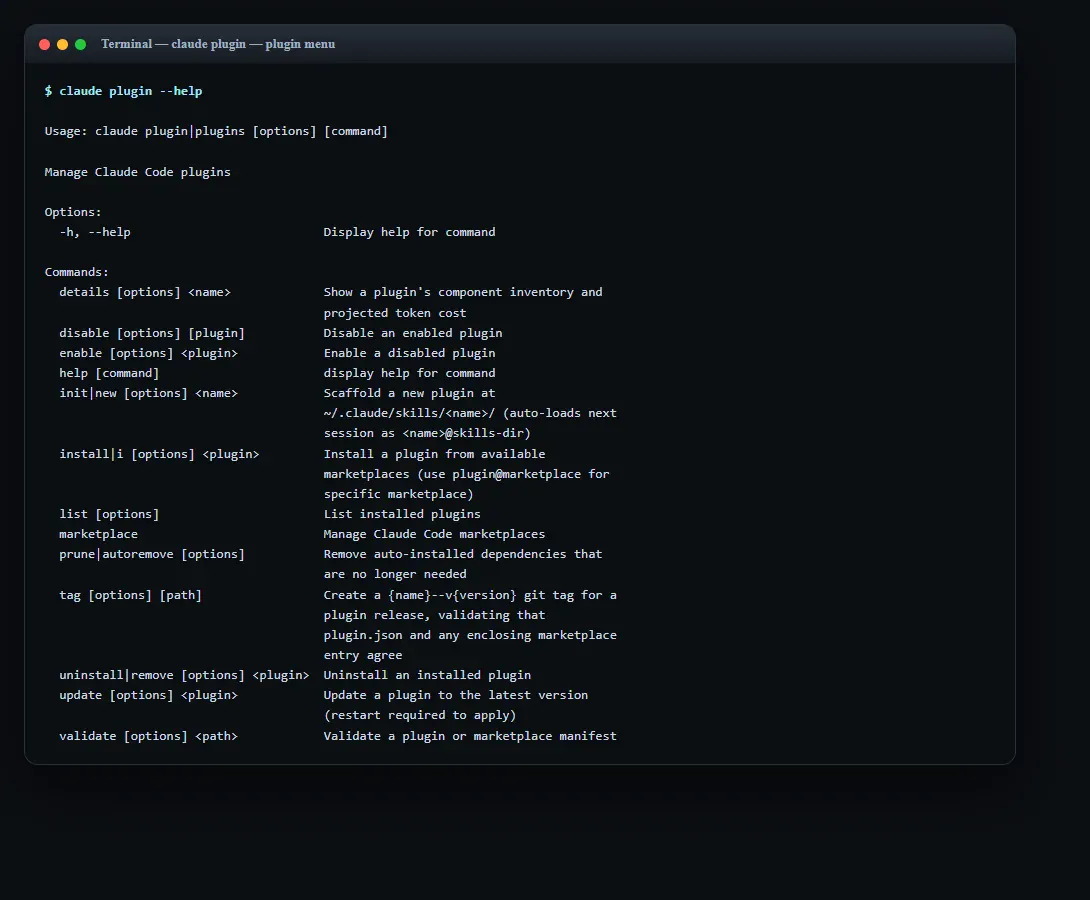
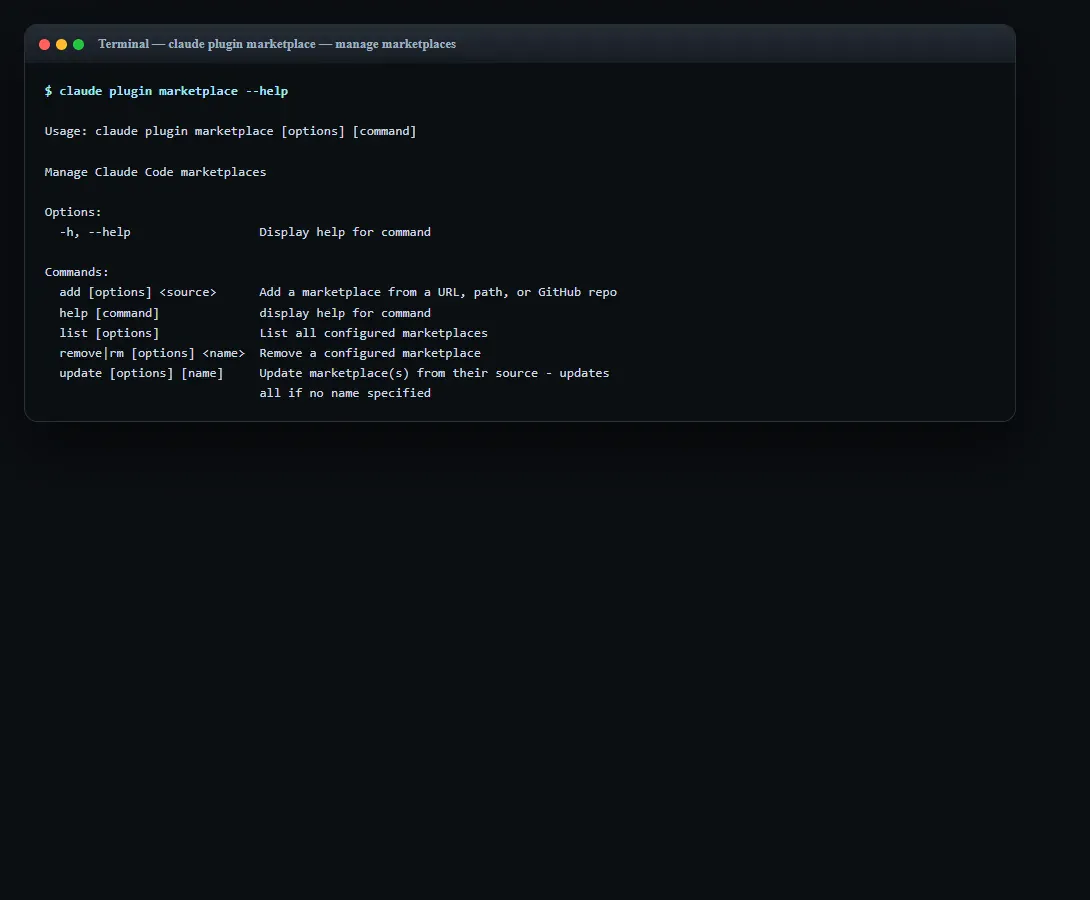
Install a plugin by name@marketplace (user scope by default), then run /reload-plugins to activate it without restarting. Or run /plugin for the tabbed manager UI. These in-session /plugin commands and the shell-level claude plugin / claude plugin marketplace commands are the same surface with two entry points, the gallery at the end of this lesson has the real --help captures for both.
- 1The manager UI. Run /plugin for tabs: Discover, Installed, Marketplaces, Errors. Cycle them with Tab / Shift+Tab.
- 2Namespacing. Plugin skills are always namespaced (e.g. /commit-commands:commit) to avoid conflicts.
Voiceover Install a plugin with slash-plugin install and name-at-marketplace, then slash-reload-plugins to activate it live. Its skills are namespaced, so this one gives you slash-commit-commands-colon-commit.
Add an MCP server with a scope
claude mcp add --transport http sentry --scope user https://mcp.sentry.dev/mcp
# # Remote HTTP server, available across all your projects$ claude mcp add --transport http sentry --scope user https://mcp.sentry.dev/mcp✔ Added HTTP MCP server 'sentry' (user scope).# # A local stdio server: options before the name, -- before the command$ claude mcp add --transport stdio --env AIRTABLE_API_KEY=KEY airtable -- npx -y airtable-mcp-server✔ Added stdio MCP server 'airtable' (local scope).
Connect external tools via MCP (Model Context Protocol, the open standard for plugging services like Sentry or Airtable into Claude). Options go before the name; choose a scope, local (default, this project only, private), project (shared via .mcp.json), or user (all your projects). The 'Added ... server' confirmation is your success signal; the next step verifies the connection with claude mcp list. The gallery has the real claude mcp --help capture with add examples.
- 1Scopes. local = this project, private (default). project = team-shared in .mcp.json. user = all your projects.
- 2Option ordering. All flags come before the server name; -- separates the name from the command and its args.
Voiceover MCP connects Claude to outside tools. Use claude mcp add with a transport and a scope, user makes it available everywhere, project shares it with your team via dot-mcp-json. Remember: flags before the name, double-dash before the command.
Authenticate and check the MCP server
/mcp (and claude mcp list)
$ /mcpsentry needs authentication, press Enter to log in✔ Authenticated 'sentry' via browser OAuth. 12 tools available.$ claude mcp listsentry http connected (user)airtable stdio connected (local)
Run /mcp inside the session to see server status and complete any OAuth login in the browser. Use claude mcp list and claude mcp get <name> from the shell to inspect.
- 1Project servers need approval. Servers from a project's .mcp.json show as 'Pending approval' until you review and approve them in an interactive session.
- 2Remove later. claude mcp remove <name> deletes a server; claude mcp get <name> shows its details.
Voiceover Open slash-mcp to check status and finish any OAuth sign-in in the browser. From the shell, claude mcp list confirms what's connected, note that team-shared project servers wait for your approval first.
Use Git conversationally, review changes
Type: what files have I changed?
$ what files have I changed?Running git status... modified: src/index.ts✔ One file changed: helloWorld() added to src/index.ts.
Claude makes Git operations conversational. Start by asking what changed so you know the working-tree state before committing.
- 1Tip. Asking before committing keeps you in control of exactly what lands in the commit.
Voiceover Git is conversational here. Ask what files you've changed and Claude runs git status for you, so you know exactly what's changed before you commit anything.
Create a branch and commit
Type: create a branch feature/quickstart, then commit my changes with a descriptive message
$ create a new branch called feature/quickstart✔ Switched to a new branch 'feature/quickstart'$ commit my changes with a descriptive messagegit add src/index.ts && git commit -m "feat: add helloWorld helper"Run this command? > Yes No✔ [feature/quickstart 9a1f2c3] feat: add helloWorld helper
Branch first if you're on the default branch, then commit. Claude proposes the git commands and message and waits for approval at the prompt.
- 1Approval still applies. In default mode Claude asks before running git commands, just like file edits.
Voiceover Ask Claude to branch, then to commit with a descriptive message. It drafts the git commands and the message, and in default mode still asks before running them, so nothing happens without your nod.
Clear context and exit
/clear then exit (or Ctrl+D)
$ /clear✔ Started a new conversation. CLAUDE.md still loaded.$ exitGoodbye! Resume later with: claude -c or claude -r✔ Session ended. Credentials remain stored.
Use /clear to start a fresh task while keeping your project memory, then exit or press Ctrl+D to leave. Your credentials persist for next time.
- 1Resume later. claude -c continues the most recent conversation; claude -r opens the resume picker.
- 2settings.json. Persisted preferences live in ~/.claude/settings.json (user) or .claude/settings.json (project) and .claude/settings.local.json (personal, gitignore it).
Voiceover When you're done, slash-clear starts a clean task while keeping your project memory, and exit or Control-D leaves. Your login persists, so next time just run claude, or claude dash c to pick up where you left off.
Reference screens
Course screenshots and visual references for the lesson flow. Re-check the live product before paid delivery or public launch.
End-to-end recap
- Installed Claude Code with the native installer and verified it with claude --version and claude doctor.
- Logged in via the browser, confirmed the active account with /status, and learned that a stray ANTHROPIC_API_KEY overrides your subscription.
- Stayed on the cautious default permission mode (Shift+Tab cycles default / acceptEdits / plan), explored read-only, and generated project memory with /init and /memory.
- Made a reviewed edit at the approval prompt, then used the everyday commands /help, /clear, and /compact.
- Built a personal skill in ~/.claude/skills/ and invoked it both implicitly and as /summarize-changes; added a marketplace and installed a plugin with /plugin install + /reload-plugins.
- Connected an MCP server with claude mcp add (choosing a scope), authenticated via /mcp, then branched and committed conversationally before /clear and exit.
Voiceover script & storyboard
Read-aloud narration for recording the video, an intro line, one line per screen in order, then an outro. Pair each line with its matching step above.
- IntroIn this walkthrough we'll set up Claude Code from scratch in the terminal, install, log in safely, configure permissions and memory, make a reviewed edit, build a skill, add a plugin, wire up an MCP server, and commit. We'll go slow and stay safety-first.
- 1Start by running the native installer for your platform. On Mac or Linux use the curl line; on Windows PowerShell use the irm pipe, and it'll drop the binary into your local bin.
- 2Confirm it worked by checking the version. If the command isn't found, open a fresh terminal so your PATH picks up the new binary, then run claude doctor for a full health check.
- 3Change into your project folder and run claude. The first launch pops a browser to sign in; if it doesn't open, press c to copy the URL and paste it into your browser yourself.
- 4Use slash-login any time to switch accounts, and slash-status to confirm which credential is actually in use. Watch out for a stray API key in your environment, it quietly takes precedence over your subscription.
- 5Shift+Tab cycles the permission mode shown in the footer: default asks before everything, acceptEdits auto-applies edits, and plan stays read-only. For a first session, stay on the cautious default.
- 6Before changing anything, let Claude explore. Ask what the project does or where the entry point lives, it reads the files it needs on its own and answers without making edits.
- 7Run slash-init and Claude scans the repo, then proposes a CLAUDE.md with your build and test commands and conventions. This is project-scoped memory, commit it so the whole team gets the same context.
- 8Slash-memory lists every instruction file currently loaded and lets you open one to edit. Keep each CLAUDE.md concise and specific, that's what makes Claude actually follow it.
- 9Ask for a simple change and Claude shows the exact diff, then pauses for approval. Read it line by line, then choose Yes for this one edit, or accept-all if you trust the run.
- 10Type slash-help to see every command, or just slash to filter. The two you'll reach for most are slash-clear to start fresh and slash-compact to shrink a long conversation without losing your project memory.
- 11A skill is just a folder with a SKILL.md inside. Make a directory under your personal skills folder, the folder name, summarize-changes, becomes the slash command you'll type.
- 12Inside, write a SKILL.md: frontmatter with a clear description so Claude knows when to use it, then your instructions. The dynamic git-diff line pre-runs and inlines your real diff before Claude ever reads the skill.
- 13Now use it two ways: ask a question that matches the description and Claude loads the skill on its own, or type slash-summarize-changes to run it explicitly. Edits to the file are picked up without restarting.
- 14Plugins come from marketplaces. Add one with slash-plugin marketplace add and an owner-slash-repo, that just registers the catalog. Only ever add sources you trust, because plugins run with your privileges.
- 15Install a plugin with slash-plugin install and name-at-marketplace, then slash-reload-plugins to activate it live. Its skills are namespaced, so this one gives you slash-commit-commands-colon-commit.
- 16MCP connects Claude to outside tools. Use claude mcp add with a transport and a scope, user makes it available everywhere, project shares it with your team via dot-mcp-json. Remember: flags before the name, double-dash before the command.
- 17Open slash-mcp to check status and finish any OAuth sign-in in the browser. From the shell, claude mcp list confirms what's connected, note that team-shared project servers wait for your approval first.
- 18Git is conversational here. Ask what files you've changed and Claude runs git status for you, so you know exactly what's changed before you commit anything.
- 19Ask Claude to branch, then to commit with a descriptive message. It drafts the git commands and the message, and in default mode still asks before running them, so nothing happens without your nod.
- 20When you're done, slash-clear starts a clean task while keeping your project memory, and exit or Control-D leaves. Your login persists, so next time just run claude, or claude dash c to pick up where you left off.
- OutroAnd that's the full loop: installed, authenticated, configured, extended with a skill, a plugin, and an MCP server, and shipped a reviewed commit, all from the terminal. You're ready to build with Claude Code.
Resources
Checkpoint