
Lesson 20 of 38 · Core - 00:45-01:00
Install and first-run checklist
Install the right agent for your shell with the exact current command, authenticate without leaking a key, and run a deliberately read-only first session, building the diff-before-approve habit that makes every later lesson safe.
This is where the course goes hands-on, and where most people quietly make their first mistake, not in the install, but in the first thirty seconds after it. The install itself is one line; the discipline around it is the lesson. You will install Claude Code (and note the parallel Codex CLI path), log in through your browser without ever pasting a raw API key into a prompt, and then deliberately keep your first session read-only: asking the agent to explore and explain before you grant it permission to change a single byte. The goal of first contact is a calm, controlled, fully reversible session, not a fast one. The two install commands and the two tools' default safety postures differ in ways that matter, and getting them right now is what lets you trust the agent with real work in Lessons 5 through 16.
Claude Code install and first-run safety protocol
Install, verify, authenticate, and run the first session with safety gates switched on.
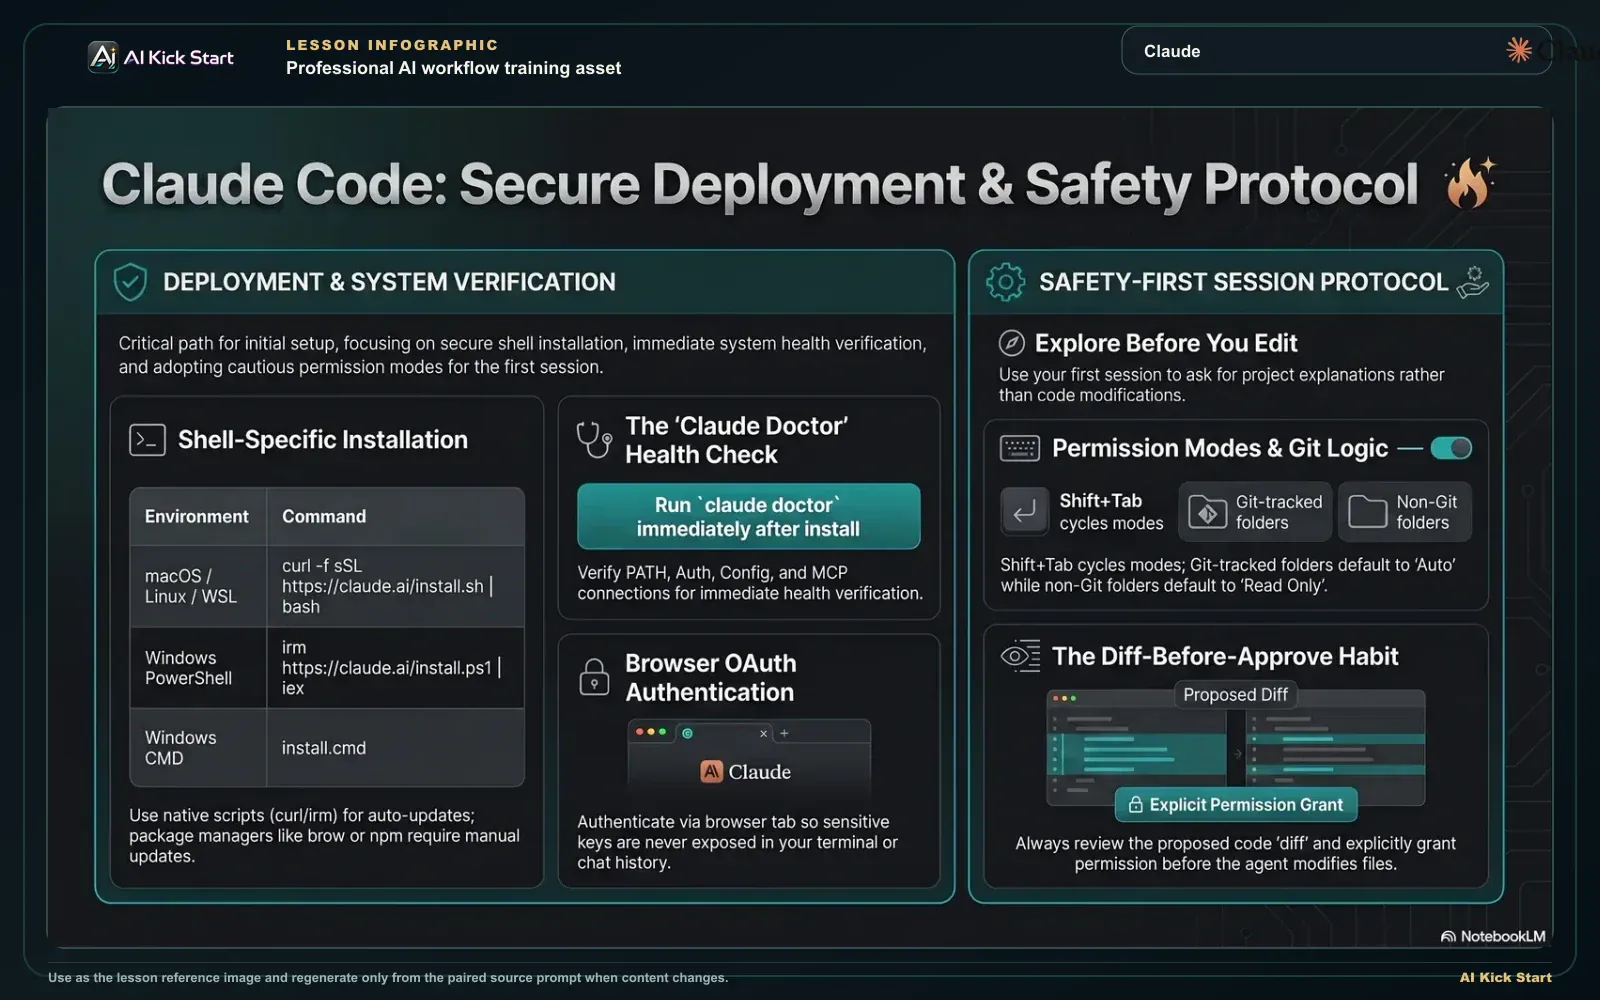
Install Claude Code with safety switched on
A branded walkthrough: shell-specific install, the doctor health check, browser OAuth, and a read-only-first, diff-before-approve first session.
What to understand
- Claude Code installs as a native binary with one command, and the command depends on your shell, not just your OS. macOS, Linux, and WSL use the curl install script (`curl -fsSL https://claude.ai/install.sh | bash`); Windows PowerShell uses `irm https://claude.ai/install.ps1 | iex`; Windows CMD has its own `install.cmd` one-liner. The classic giveaway error tells you which shell you're in: `The token '&&' is not a valid statement separator` means you're in PowerShell, not CMD; `'irm' is not recognized` means you're in CMD, not PowerShell. Your prompt also tells you, `PS C:\` is PowerShell, plain `C:\` is CMD.
- There is more than one supported install path, and the trade-off is auto-update versus control. The native installer (recommended) auto-updates silently in the background. Homebrew (`brew install --cask claude-code`, or `claude-code@latest` for the bleeding edge), WinGet (`winget install Anthropic.ClaudeCode`), and npm (`npm install -g @anthropic-ai/claude-code`, Node 18+) all work but do NOT auto-update, you upgrade them manually. For a first install on a personal machine, the native installer is the path of least friction.
- On native Windows, Git for Windows is the difference between the Bash tool and the PowerShell tool. Installing Git for Windows is optional but recommended: with it, Claude Code runs shell commands through Git Bash; without it, it falls back to a PowerShell tool. WSL 2 is the other route on Windows and is the only one that supports sandboxed command execution, choose WSL if your projects live in a Linux toolchain or you want the sandbox.
- You always verify before you trust. After install, `claude --version` confirms it's on PATH, and `claude doctor` runs a full health check. PATH, auth status, config, update status, and MCP servers. Running `claude doctor` immediately after install is the cheapest way to catch a broken PATH or a stale shell session before it confuses you mid-task.
- A session starts by changing into a project directory and running `claude`. On first use you authenticate through your browser with a Pro, Max, Team, Enterprise, or Console account, the free Claude.ai plan does NOT include Claude Code (this is the Lesson 3 access gate made real). Credentials are stored after the first login, so you don't repeat it each session, and you can re-authenticate or switch accounts later with `/login`.
- The first thing you do in any session is explore, not edit. Ask 'what does this project do?', 'explain the folder structure', 'where is the main entry point?', the agent reads files on its own, as needed, without you attaching anything. Reading is cheap, reversible, and teaches you how the agent reasons about your codebase before it can touch it.
- Claude Code asks permission before modifying files, and you control how much it can do with permission modes you cycle using Shift+Tab. Default mode asks before every file modification; there is also an Accept-edits mode, a read-only plan mode (stricter, no edits at all), and (on WSL) a sandboxed bypass mode. Keep it in default mode for the entire first session, the approval prompt exists precisely so you can say no after reading the diff.
- Essential session controls are slash commands: `/help` lists everything, `/clear` resets context, `/login` re-authenticates, `/config` opens settings, and `exit` or Ctrl+D leaves cleanly. Typing a bare `/` reveals all commands and installed skills, this is your in-session map.
- Codex has its own CLI for terminal workflows, and a critical default difference: in a git-tracked folder, Codex defaults to 'Auto' (workspace-write, it can edit and run commands in the working directory without asking), and only defaults to Read Only in non-version-controlled folders. Claude Code's default (ask-before-edit) mode and Codex's Read Only mode are the matching safe postures, but with Codex you must explicitly choose Read Only for a git repo's first run, because its out-of-the-box default in a repo is more permissive than Claude Code's.
Deeper dive
Why a throwaway directory + read-only first is non-negotiable
An agent's first session is the one where you have the least calibration about how it behaves on YOUR code, what it assumes, how broadly it interprets a request, how aggressively it edits. That is exactly the wrong moment to point it at anything you can't afford to lose. A throwaway directory (a fresh `git init` scratch repo, or a copy of a real project) turns every possible mistake into a non-event: the worst case is you delete the folder. Read-only-first stacks a second layer of safety on top, even inside the scratch repo, you start by only letting the agent read and explain, so you watch a few full reason-and-answer cycles before any write is even possible. The combination is belt-and-braces on purpose: the directory bounds the blast radius, and the read-only stance bounds the actions. By the time you grant your first write permission, you have evidence, not hope, about how the agent treats your files. This is the same instinct a surgeon has for a dry run, or a pilot for a checklist: the cost of the precaution is two minutes; the cost of skipping it is unbounded.
Browser OAuth vs pasting an API key, the auth security model
Both tools authenticate through a browser OAuth flow by default: you run the command, a browser tab opens, you log in to your existing account, and the tool receives and caches a token (Claude Code stores credentials after login; Codex caches an OAuth token at `~/.codex/auth.json`). This is the path you want, because the long-lived secret never passes through your shell history, your clipboard buffer, or, critically, a prompt to the agent itself. The failure mode to avoid is pasting a raw API key into the agent's chat as if it were a normal message: that key is now in the conversation context, may be logged, and could end up echoed back. If you must use a key (CI, headless servers, no browser), put it in an environment variable the tool reads at startup, never in a prompt. Codex even offers `codex login --device-auth` for exactly the headless case, it prints a URL and a one-time code you enter in any browser, so no key touches the terminal at all. Treat the auth step as the first security decision of the course, because it is.
The diff-before-approve loop is the whole skill in miniature
Every safe agentic workflow, no matter how advanced, reduces to one repeated micro-decision: the agent proposes a change, shows you the diff, and waits; you read it and either approve or reject. The first-run exercise, approving one trivial, reversible edit after reading its diff, is not busywork; it is you rehearsing the single most load-bearing habit in the entire discipline at the lowest possible stakes. The reason beginners get burned later is that they train themselves to click 'approve' reflexively on the easy changes, so the muscle memory is 'approve' by the time a risky change arrives. Build the opposite reflex now: every approval prompt is a question, and a question you can answer 'no' to. The diff is the contract. If you can't read a diff comfortably, that, not the install, is the real prerequisite for everything that follows, and a one-line README comment is the perfect place to practice reading one.
The safe first-run funnel
Read top to bottom: each stage narrows what the agent can do, ending at the one habit the whole course rests on, approve only after reading the diff.
- Install for your shellRun the native command that matches your prompt, `irm … | iex` in PowerShell, `curl … | bash` on macOS/Linux/WSL, `install.cmd` in CMD. Wrong shell = a confusing separator error, not an install.
- Verify before you trust`claude --version` confirms it's on PATH; `claude doctor` health-checks PATH, auth, config, and MCP. A green doctor here saves you blaming the agent for a PATH bug later.
- Throwaway dir + browser authOpen a scratch `git init` repo (never production) and log in via the browser OAuth tab. Never paste a raw API key into the chat, the disposable folder bounds the blast radius.
- Lock default modeShift+Tab until the footer reads default, the mode that asks before every file write. Not Accept-edits, not bypass; plan mode is stricter still, but it would block the one reviewed edit this lesson needs.
- Read-only exploration firstAsk it to explain the project and cite the files it opens. Watch a few full reason-and-answer cycles so you calibrate on YOUR code before any write is possible.
- First reviewed changeApprove exactly one tiny README comment, but only after reading its diff line by line, then verify only that file changed. The diff is the contract: every approval is a question you can answer 'no' to.
Step by step
Identify your shell, then run the matching install command
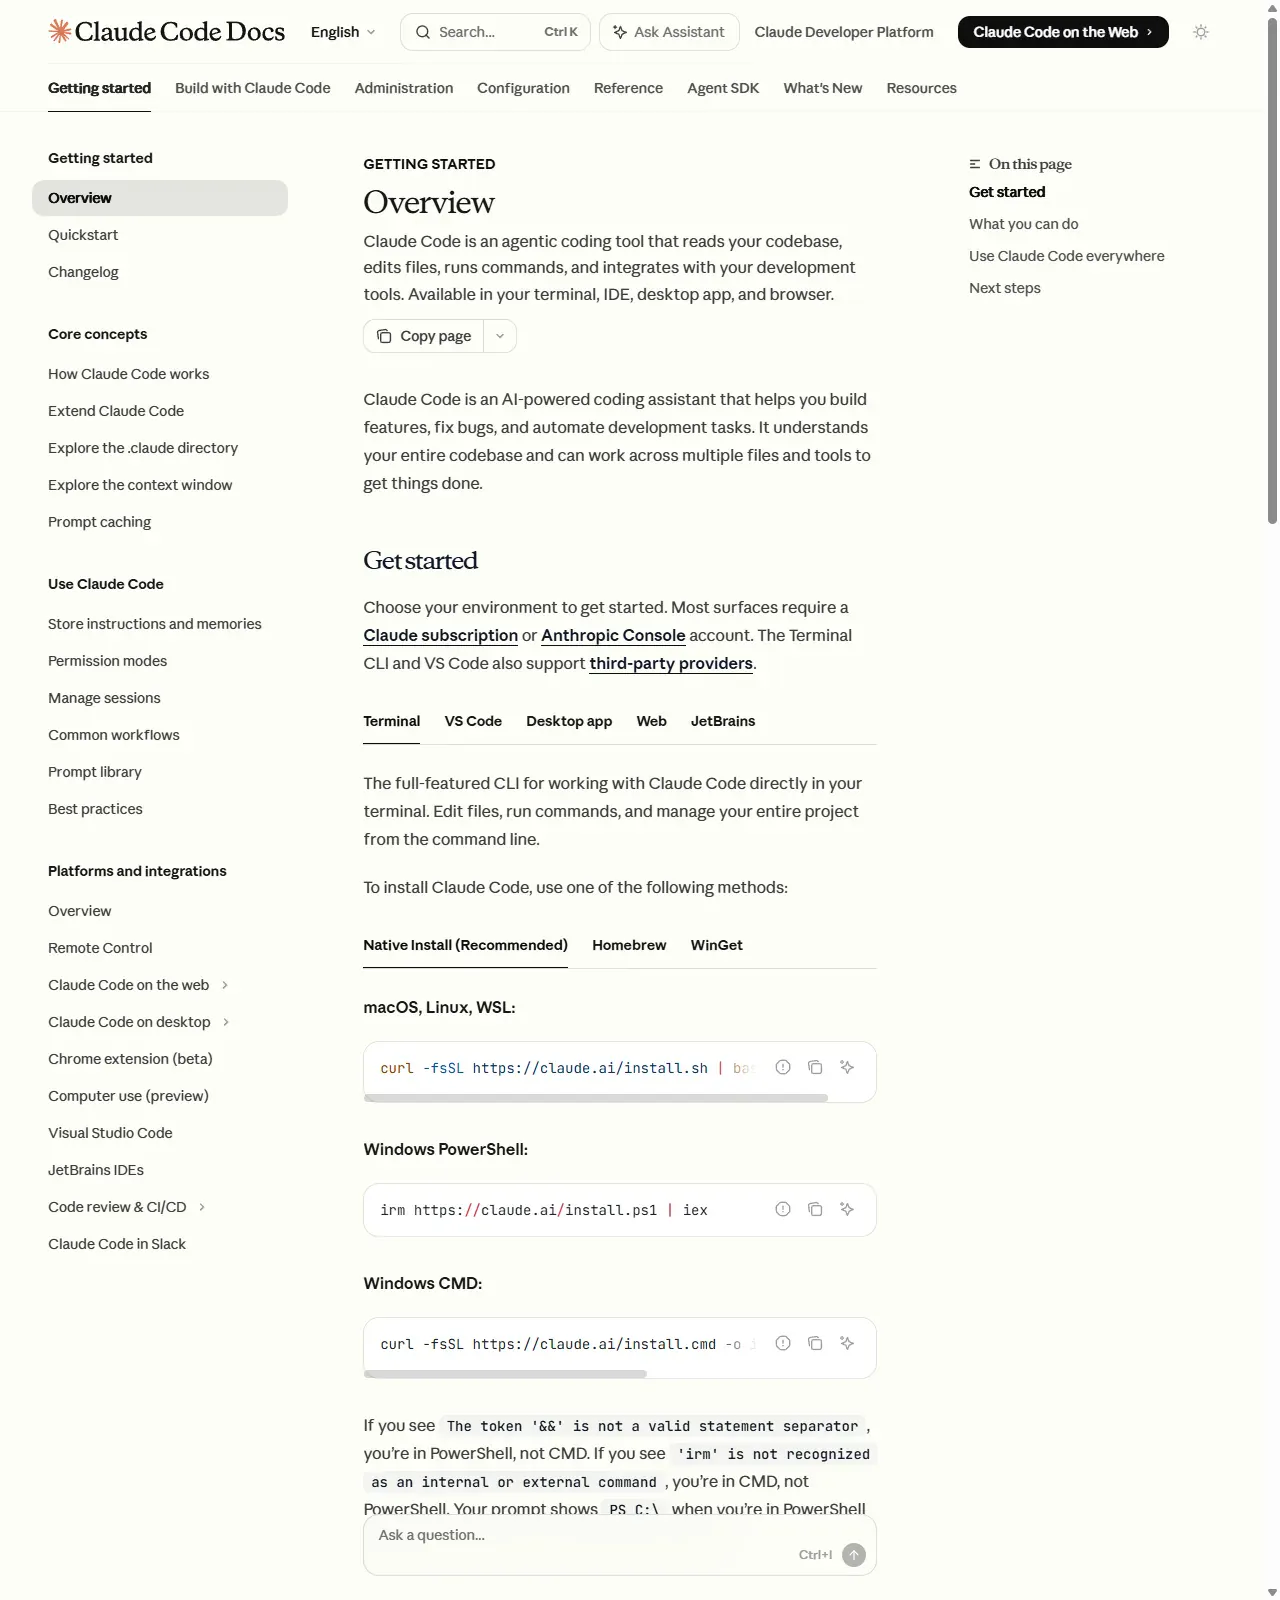
First confirm which shell you're in (your prompt shows `PS C:\` for PowerShell, plain `C:\` for CMD; macOS/Linux/WSL show a `$` or `%`). Then run the matching native install: macOS/Linux/WSL → `curl -fsSL https://claude.ai/install.sh | bash`; Windows PowerShell → `irm https://claude.ai/install.ps1 | iex`; Windows CMD → `curl -fsSL https://claude.ai/install.cmd -o install.cmd && install.cmd && del install.cmd`. On native Windows, install Git for Windows first if you want the Bash tool instead of the PowerShell fallback. The installer should finish with an "installed to …" line, then verify properly in step 2.
HintIf you see `The token '&&' is not a valid statement separator`, you ran the CMD command in PowerShell, switch to the `irm … | iex` line. If you see `'irm' is not recognized`, you're in CMD, use the install.cmd line.
On this screen
- 1What to notice. The Terminal/Tab in the docs holds the exact install command per shell, copy the one matching your prompt, not just your OS.
- 2Why it matters. Native install auto-updates in the background; Homebrew/WinGet/npm do not and must be upgraded manually, pick native for the smoothest first install.
- 3Windows detail. Git for Windows enables the Bash tool; without it Claude Code uses a PowerShell tool. WSL 2 is the only Windows path that supports the command sandbox.
Verify the install before you trust it
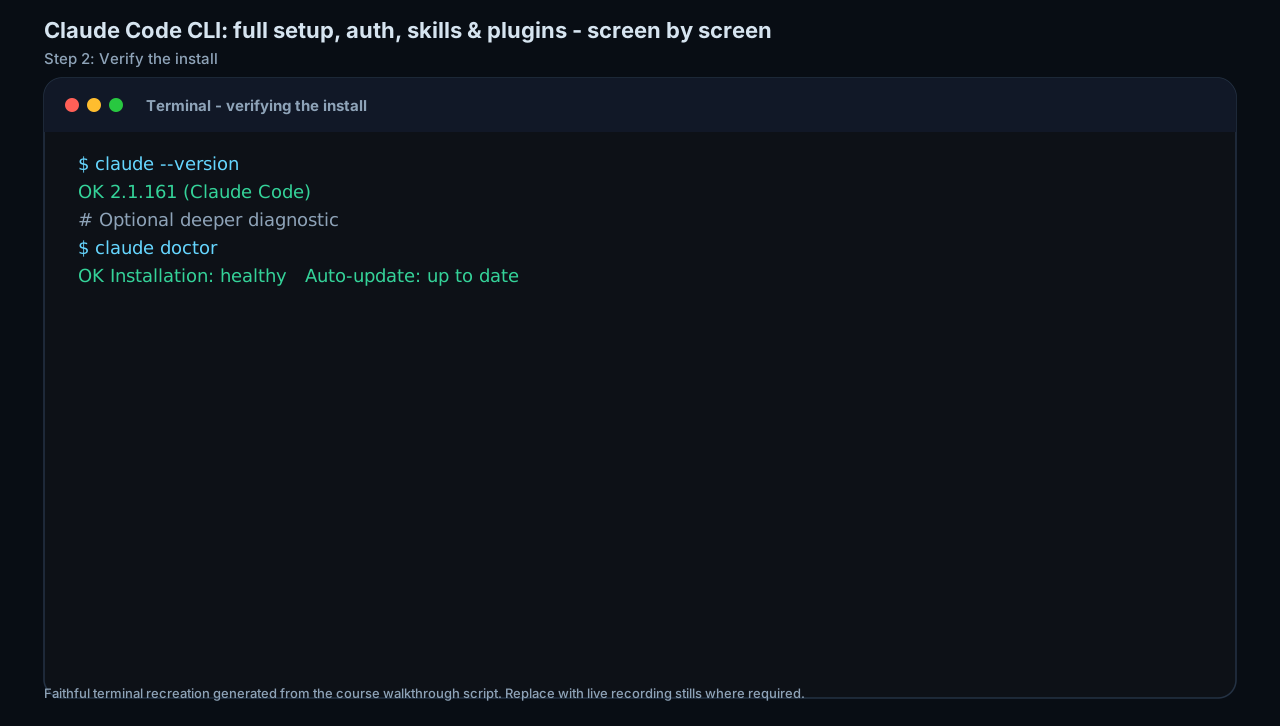
Run `claude --version` to confirm the binary is on your PATH, then run `claude doctor` for a full health check of PATH, auth, config, update status, and MCP servers. Read the doctor output, a green install here saves you from blaming the agent for a PATH problem later.
HintIf `claude` is 'command not found', open a fresh terminal so it picks up the updated PATH before assuming the install failed.
On this screen
- 1What to notice. `claude doctor` is the one command that tells you whether install, PATH, and auth are all actually healthy, run it every time something feels off.
- 2Two checks, two purposes. `claude --version` proves the binary is on PATH (the version line is the pass signal); `claude doctor` goes deeper, the OK lines for installation and auto-update are what 'healthy' looks like.
Open a throwaway project and authenticate via the browser
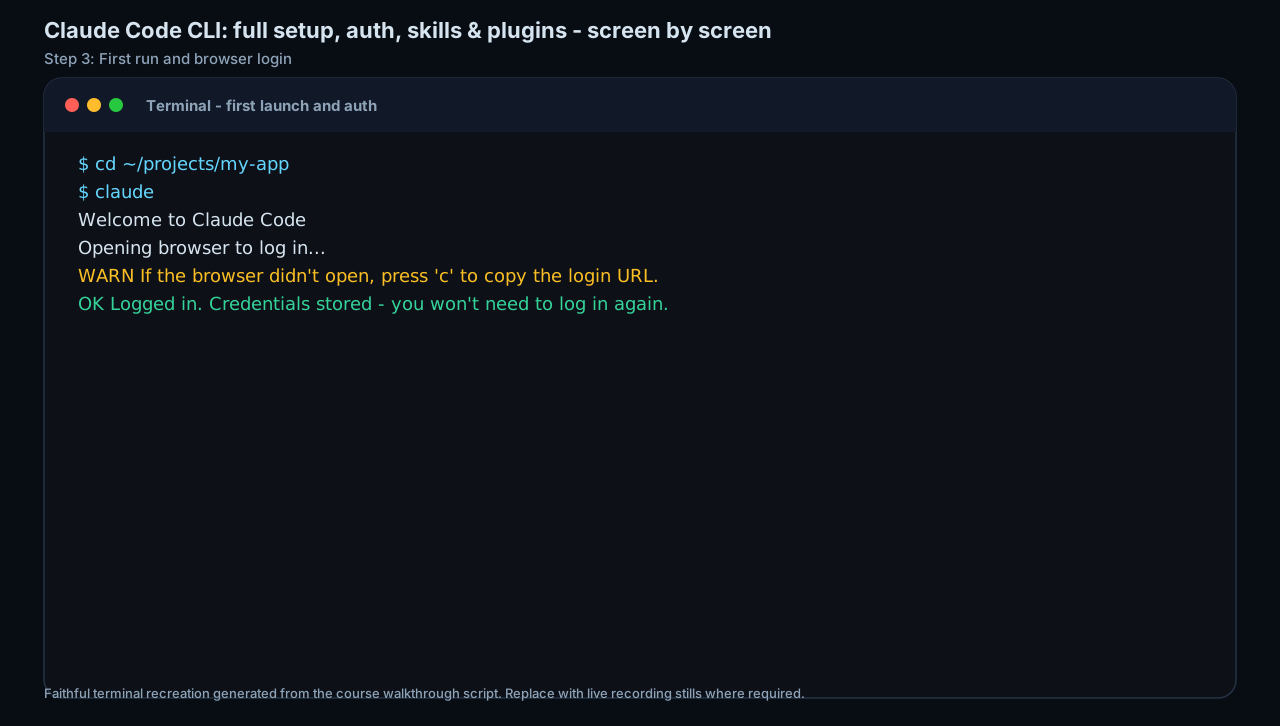
Change into a low-stakes directory, a fresh scratch repo (`git init` in an empty folder) or a copy of a real project, never production. Run `claude`. On first use a browser tab opens; complete login with your Claude Pro, Max, Team, Enterprise, or Console account. Do NOT paste an API key into the chat, the browser OAuth flow stores credentials for you.
HintThe free Claude.ai plan does not include Claude Code (Lesson 3's access gate), confirm you're on an eligible plan before you start, not mid-task.
On this screen
- 1What to notice. You cd into the project folder and run `claude`; the welcome banner appears and the browser opens for login, credentials are stored, so you won't repeat this next session. The demo shows a real-looking project folder (~/projects/my-app); yours should be the scratch repo you just created.
- 2Security. Auth happens in the browser; the long-lived secret never enters your shell history or the chat. Re-auth or switch accounts later with /login.
- 3Blast radius. A scratch or copied project means the worst possible first-run mistake is deleting a throwaway folder, bound the risk before you grant any permission.
Lock default mode, the ask-before-every-edit mode
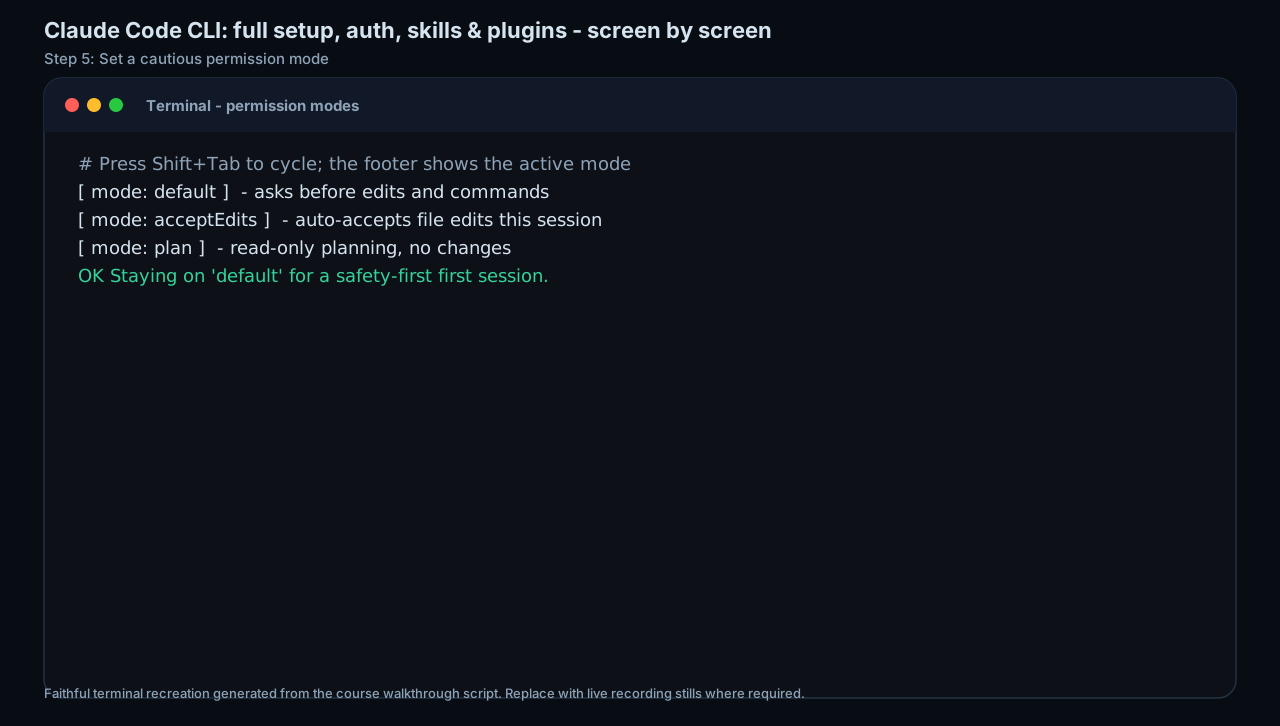
Press Shift+Tab to cycle permission modes and confirm you're in default mode, the mode that asks before every file modification, not Accept-edits and not any bypass mode. Plan mode is even stricter (no edits at all), but for this lesson you WANT the agent able to propose one edit in step 6, default keeps the approval prompt armed without blocking the exercise. Type `/help` to see the command list and confirm you can find `/clear`, `/login`, and `/config`. Type a bare `/` to reveal all commands and installed skills.
HintResist Accept-edits on your first session, you want to see and read every proposed action while you're still building trust in how the agent behaves.
On this screen
- 1What to notice. Shift+Tab cycles the modes; default is the one that pauses on every write so you can review the diff first.
- 2The footer names the mode. Each Shift+Tab press changes the footer label, default asks before edits and commands, acceptEdits auto-accepts, plan is read-only. Stop cycling when it reads default.
Run a fully read-only exploration
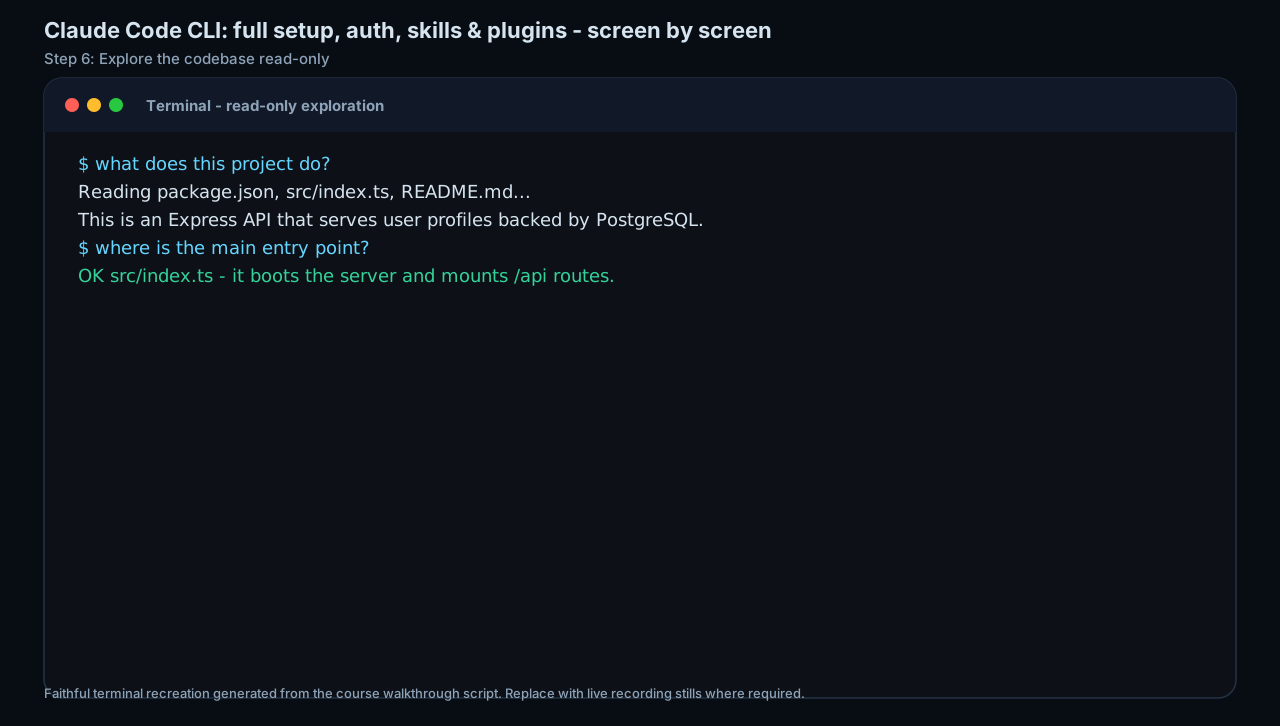
Paste the read-only first-contact prompt from this lesson as your opening message, then let it work. Read its answers and confirm it is only reading files, naming which file and why when it opens one, and not proposing any edits. Follow up with 'where is the main entry point?' if it didn't already cover it.
HintWatching a few complete read-and-answer cycles before any write is possible is how you calibrate the agent on YOUR code at zero risk.
On this screen
- 1What to notice. A well-behaved read-only session explains and cites the files it reads, and never slips a code suggestion into the answer.
- 2Files cited, no edits offered. A healthy read-only session looks like this, it names the files it reads (package.json, src/index.ts, README.md) and answers in prose without proposing a single change.
Approve exactly one tiny, reviewed, reversible change
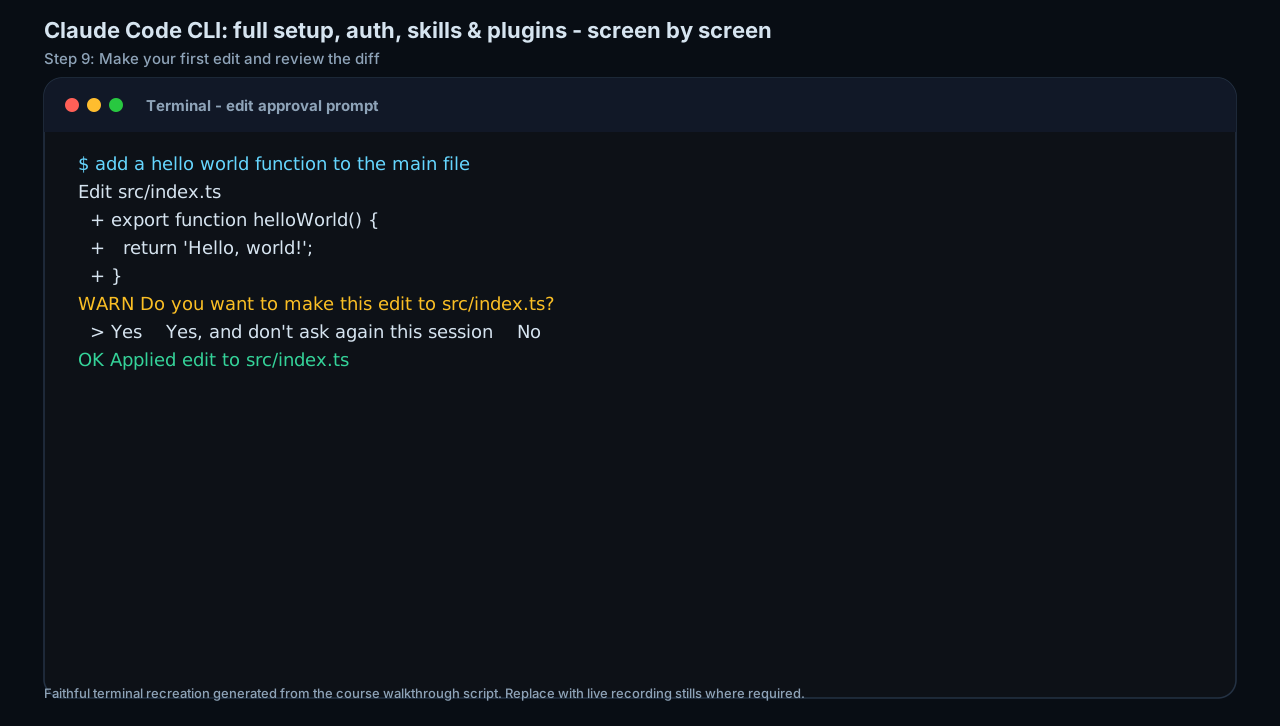
Send the 'first reviewed change' prompt, ask for a single one-line comment at the top of the README explaining what the project is. When Claude Code shows the proposed diff and asks for approval, READ the diff line by line before approving. After it applies, ask 'what files have I changed?' and verify the answer matches the diff you approved.
HintReading the diff before approving is the single load-bearing habit of the whole course, the approval prompt exists so you can say no.
On this screen
- 1What to notice. The diff is the contract: approve only what you can see and understand, and verify afterward that nothing extra changed.
- 2This prompt is the gate. The demo shows a different edit (a hello-world function), but the UI is identical to what you'll see for your README line: the proposed diff, then 'Do you want to make this edit?', and No is always one of the answers.
Note the Codex CLI path and its different default
Visit developers.openai.com/codex and note the Codex CLI install paths: standalone (`curl -fsSL https://chatgpt.com/codex/install.sh | sh`), npm (`npm install -g @openai/codex`, use the scoped name, not the unrelated 2012 `codex` package), or Homebrew (`brew install --cask codex`). Authenticate with `codex` (Sign in with ChatGPT or an API key; `codex login --device-auth` for headless). Critically: in a git repo Codex defaults to Auto (workspace-write, it can edit and run without asking), so for a safe first run explicitly choose Read Only via `/approvals` or `--sandbox read-only`.
HintCodex's in-repo default (Auto) is more permissive than Claude Code's default mode, don't assume the same safety posture carries over; set Read Only yourself. And install the scoped `@openai/codex` package: the unscoped `codex` on npm is an unrelated 2012 project that produces confusing errors.
Close the session cleanly
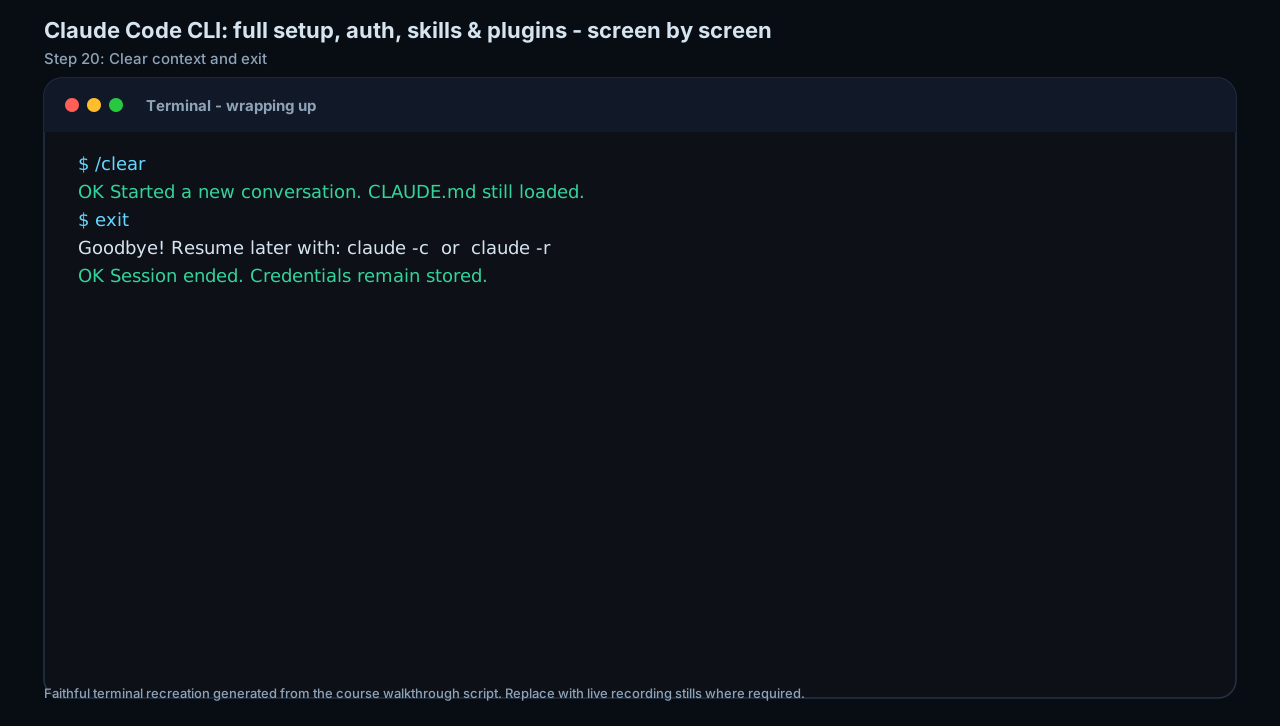
Back in Claude Code, run `/clear` to reset context, then `exit` (or Ctrl+D) to end the session deliberately rather than just closing the window. This leaves a clean state and is the habit that prevents stale context bleeding into your next, real task. You know it worked when your next claude session opens with no memory of this one.
HintEnding on `/clear` + `exit`, not a closed window, is the same discipline as logging out of a shared machine: deliberate, clean, repeatable.
On this screen
- 1Clear, then exit. /clear empties the conversation context (the 'CLAUDE.md still loaded' line refers to project standing instructions, covered in Lesson 6); exit ends the session cleanly, and the goodbye line shows claude -c / claude -r exist if you ever need to resume.
Install Claude Code with the command that matches your shell, verify with `claude --version` and `claude doctor`, authenticate via the browser (never paste a key into the chat), then in a throwaway directory run a fully read-only exploration using the first-contact prompt, and finally approve exactly one tiny reversible README comment after reading its diff and verifying the change.
A working, logged-in Claude Code install plus a first-run log capturing: the install command you used and your shell, the `claude doctor` result, the read-only explore questions you asked, and the single reviewed change you approved (with confirmation that only that file changed).
Production prompt examples
ROLE: You are a careful senior engineer onboarding to an unfamiliar codebase. For THIS entire reply, you are in strict read-only mode.

CONTEXT: This is my first session with you in this repository. I have not yet decided whether to let you make any changes. I want to understand the project before granting any write permission.

TASK: Explore and explain only. Do not propose, stage, or make any edits. Do not run shell commands, install anything, or touch git.

DO:
- Tell me in 3-5 sentences what this project does and who it is for.
- Describe the top-level folder structure and what each main directory is responsible for.
- Identify the main entry point and the single most important file to read first, with a one-line reason.
- Flag anything that looks risky to change (config, secrets, generated files, migrations).

DO NOT:
- Suggest a single code change.
- Read more files than you need; if you open something, say which file and why.

OUTPUT FORMAT:
1. What this project is (3-5 sentences).
2. Folder map (bullet per top-level dir).
3. Read-this-first file + reason.
4. Change-with-care list.
- ROLE + 'strict read-only mode' sets the safety posture in words, reinforcing whatever permission mode you've selected, belt and braces.
- 'I have not yet decided whether to let you make any changes' tells the agent the social contract: explanation now, permission maybe later.
- The explicit DO NOT list ('not a single code change', 'no shell, no git') closes the gaps a vague 'just explore' would leave open.
- 'If you open something, say which file and why' makes the agent's reading visible, you learn how it navigates, and you cap token spend (the Lesson 3 habit).
- The numbered OUTPUT FORMAT gives you a skimmable map and proves the agent stayed in explanation mode instead of drifting into edits.
ROLE: Senior engineer making the smallest possible reversible change so I can practice reviewing a diff.

CONTEXT: We just finished a read-only exploration of this scratch repo. I now want to grant exactly ONE tiny change and review it before it is applied.

TASK: Add a single one-line comment at the very top of README.md that states, in plain language, what this project is. Change nothing else.

CONSTRAINTS:
- Show me the proposed change as a diff and WAIT for my approval before writing anything.
- Touch only README.md. Do not reformat the file, reorder lines, or alter any other content.
- Do not run git, do not commit, do not stage. I will handle version control.
- Keep your explanation to one sentence.

AFTER I APPROVE:
- Apply only the approved diff.
- Then tell me exactly which file(s) changed so I can verify.
- 'smallest possible reversible change' is deliberate: the lesson is the review habit, not the edit, so the edit must be trivial to undo.
- 'Show me the diff and WAIT for my approval' is the core gate; it forces the approve-after-reading loop even if your permission mode would have prompted anyway.
- 'Touch only README.md, do not reformat or reorder' prevents the classic surprise where an agent 'helpfully' rewrites the whole file alongside your one line.
- 'Do not run git / I will handle version control' keeps the agent out of state-changing commands on your first run, so you stay fully in control of history.
- 'Tell me which file(s) changed so I can verify' trains the verify step, you confirm reality matches the approved diff instead of assuming it.
Common mistakes to avoid
- Running the install command for the wrong shell, pasting the CMD `&&` line into PowerShell (or `irm` into CMD) and getting a confusing separator/'not recognized' error instead of an install.
- Doing your first run inside a production or important directory instead of a fresh scratch repo or a disposable copy.
- Pasting a raw API key into the agent's chat instead of using the browser OAuth flow (or an env var for headless), leaking a long-lived secret into context and logs.
- Enabling Accept-edits (or any bypass mode) on the first session, so changes happen before you've learned to read the diffs.
- Approving a proposed change without reading the diff, the approval prompt is there for review, not just to click through.
- Assuming Codex inherits Claude Code's cautious default, in a git repo Codex defaults to Auto (workspace-write), so it can edit and run without asking unless you set Read Only.
- Installing the unscoped `codex` npm package by mistake instead of `@openai/codex`, then chasing errors with no obvious cause.
- Skipping `claude doctor` after install and later blaming the agent for what is actually a PATH or stale-shell problem.
Source conflicts to review
- Claude Code install commands verified against the official code.claude.com/docs/en/setup page (June 2026). Install URLs and PATH locations occasionally change between major versions, re-copy from the docs Tabs rather than from memory or older blog posts.
- Codex CLI's official quickstart shows install + 'sign in' but does NOT teach a read-only-first discipline, and in a git repo the CLI defaults to Auto (workspace-write), not Read Only. The safe first-run posture in this lesson is the deliberate, recommended practice, not the out-of-the-box default. Verify the current default on the agent-approvals page before relying on it.
- The Node.js floor differs by tool and source: Claude Code's npm package documents Node 18+; third-party guides cite Node 22+ for Codex's npm path while OpenAI's quickstart does not state a version. Prefer the native/standalone installer (no Node dependency) on a first install, and check the npm page if you go the npm route.
- Codex's session-level command to change approval mode is documented as `/approvals` on the developer docs and `/permissions` in some write-ups, if one doesn't appear, type `/` to list the current commands for your installed version.
Key terms
- Native install
- Installing Claude Code via the official one-line script (curl/irm/install.cmd), which then auto-updates in the background. Homebrew, WinGet, and npm installs do not auto-update.
- Shell
- The program interpreting your terminal commands (Bash, Zsh, PowerShell, CMD). The correct install command depends on the shell, not just the OS.
- PATH
- The list of folders your shell searches for commands. 'command not found' right after an install usually means the terminal hasn't reloaded PATH, open a fresh one before assuming the install failed.
- WSL
- Windows Subsystem for Linux, a full Linux environment inside Windows. On Windows it is the only route that supports Claude Code's command sandbox.
- git init
- The command that turns an empty folder into a version-tracked repository, making every later change recoverable, which is what makes a scratch repo genuinely throwaway.
- claude doctor
- The built-in health check that reports PATH, auth status, config, update status, and MCP servers, run it right after install.
- MCP server
- An external tool connection the agent can use; claude doctor checks yours are healthy. Covered properly later in the course.
- Browser OAuth
- Logging in through a browser tab so the long-lived secret is never typed into the shell or the chat; credentials are cached afterward.
- Permission mode
- The session setting controlling how much the agent can do before asking; cycled with Shift+Tab. Keep default mode (ask-before-every-edit) for a first run.
- Diff
- The before-and-after view of a proposed change that you read and approve (or reject) before it is applied.
- /clear
- The slash command that resets the conversation context within a session, so a finished task's history doesn't bleed into the next.
- Read Only (Codex)
- Codex's safe mode, read and answer only, approval required before edits, commands, or network. It is the default only in non-git folders; git repos default to Auto.
- Auto / workspace-write (Codex)
- Codex's default mode inside a git repo, it can read, edit, and run commands in the working directory without asking, requesting approval only outside the workspace or for network.
Resources
Checkpoint